Showing posts with label badass. Show all posts

Sunday, October 5, 2014

Recipe: Competition Chili

Hello friends. I already have an excellent recipe posted, which is fast and easy, BUT for competition, you need to bring a little something extra. Here's what I'll be making for the workplace chili contest on Monday, October 20, 2014:

Too bad you can't taste this... 

Bad Ass Competition Chili
Makes approx. 1 gallon

INGREDIENTS
  • 3 each: guajilo, ancho, and pasilla chiles
  • 1.5 lbs short ribs (cut the meat from the bones)
  • 2 lbs ground beef
  • 1 28 oz can diced tomato
  • 1 28 oz can crushed tomato
  • 1 6 oz can tomato paste
  • 2 15 oz cans dark red kidney beans, drained and rinsed
  • 2 Tbs whole cumin (seeds)
  • 2 tsp ground coriander
  • 2 tsp oregano
  • 1 tsp red pepper flake
  • 1/2 tsp cayenne
  • 1 red pepper, diced small
  • 2 large onions, diced
  • 2 Tbs minced garlic
  • Some chicken broth
  • Canola oil
  • Salt
INSTRUCTIONS
  1. Remove seeds from chiles, cut into small pieces, toast lightly in a skillet, set aside
  2. Toast cumin seeds in same skillet. Set aside
  3. Grind cumin seeds in a mortar and pestle or spice grinder - get 1 Tbs
  4. Rehydrate chiles in hot/boiling water for 20-30 mins
  5. Put chiles in the blender along with spices (cumin, coriander, red pepper flake, cayenne, garlic,  oregano) and enough of the chile rehydration water to make a paste.
  6. Process into paste. Add chile water as needed to keep it moving
  7. Brown short ribs in the dutch oven. Be sure to get a shitload of color on those ribs - all sides. Remove and cut into small pieces.
  8. Cook onions and red pepper in same pot - don't clean-out the fond form the short ribs. Cook until softened - about 6 mins.
  9. Add ground beef and cook until brown. About 6-8 mins
  10. Add tomato paste and stir through. Allow the mixture to "cook" the paste a bit on the bottom of the pot - about 5 minutes
  11. Add pepper paste, tomato products, beans, and cut-up short ribs. Stir
  12. Drop heat to low, and simmer for ~60 mins with the lid on. Stir from time to time
  13. Remove or skew the lid and cook for another 30-45 mins.
  14. Done. For best results, cool and rest overnight. It will be better the following day.
NOTES
  • Do I really need to use dried chiles? >> Only if you want to win.
Here's what the chiles look like. The ancho is like a big raisin

Thursday, November 28, 2013

Recipe: Pumpkin Cheesecake

Just in-time for Thanksgiving 2013, there is pumpkin cheesecake. And this is no ordinary cheesecake, friends, this is the top of the cheesecake mountain. Pay attention!

Pardon the jungle tablecloth; I was at the in-laws

Pumpkin Cheesecake
Serves 12 (depending on how much turkey, stuffing, gravy, mashed potatoes, sweet potatoes, green bean casserole, cranberry sauce, dinner rolls, and corn you had for dinner)

INGREDIENTS
Crust
  • 5 ounces graham crackers (usually 9 whole crackers)
  • 3 tablespoons sugar
  • ½ teaspoon ground ginger
  • ½ teaspoon ground cinnamon
  • ¼ teaspoon ground cloves
  • 6 tablespoons butter, melted
Note the Christmas beer in the background
Filling
  • 1-1/3 cups sugar
  • 1 teaspoon ground cinnamon
  • ½ teaspoon ground ginger
  • ¼ teaspoon ground nutmeg
  • ¼ teaspoon ground cloves
  • ¼ teaspoon ground allspice
  • ½ teaspoon salt
  • 1 can (15 oz) pumpkin
  • 1-½ pounds cream cheese, left at room temperature for 30 minutes
  • 1 tablespoon vanilla extract
  • 1 tablespoon lemon juice (1 medium lemon will be enough)
  • 5 large eggs, left at room temperature for 30 minutes
  • 1 cup heavy cream
Not pictured: lemon & vanilla

INSTRUCTIONS
Crust
  1. Heat oven to 325 degrees.
  2. Spray bottom and sides of 9-inch springform pan evenly with nonstick cooking spray
How to assemble your springform pan: There are two sides, the concave (1) and the convex (2), use the convex - you don't want the crust to be trapped in the concave base of the pan. Slip the base into the side (3)  and tighten the spring (4). Now ready to spray with Pam (or other cooking spray)
  1. Pulse crackers, sugar, and spices in food processor until evenly and finely ground, about fifteen 2-second pulses
Just dump all the ingredients in together and then pulse a number of times until it's ready. If you don't have a food processor, put the crackers into a large zip top bag and crush with a rolling pin until thoroughly pulverized
  1. Transfer crumbs to medium bowl, drizzle melted butter over, and mix with fork until evenly moistened
When it's mixed properly, it will look like wet sand
  1. Dump crumbs into prepared springform pan and, using fork, spread crumbs into even layer. Using flat-bottomed drinking glass, press crumbs evenly into pan bottom - smooth crumbs into edges of pan
Work that sand until it's smooth and a good crust. Allow the sides to come-up a little bit
  1. Bake until fragrant and browned around the edges, about 15 minutes. Cool on top of stove while making filling
Filling
  1. Fill a teapot with water and bring to a boil
  2. Meanwhile, whisk sugar, spices, and salt in small bowl; set aside
Sugar and spices become one homogeneous mix - smells like the holidays
  1. To dry pumpkin: Line baking sheet with triple layer of paper towels. Spread pumpkin on paper towels in roughly even layer. Cover pumpkin with second triple layer of paper towels and press firmly until paper towels are saturated. Peel back top layer of towels and discard. Grasp bottom towels and fold pumpkin in half; peel back towels. Repeat and flip pumpkin onto baking sheet; discard towel
Begin by preparing the pan and the paper towels. Then dump the canned pumpkin in the middle and spread-out with a rubber spatula

Then press-down on the top with the second layer of paper towels - look at all the moisture that's being removed! Then you can fold it into a little pumpkin envelope and even pick it up with your hands
  1. In standing mixer fitted with flat beater, beat cream cheese at medium speed to break up and soften slightly, about 1 minute
If it's softened to room temperature, the cream cheese will blend nicely. No stand mixer? Break-out the weak-ass hand mixer, and start mixing
  1. Scrape beater and bottom and sides of bowl well with rubber spatula. Add sugar mixture and beat at medium-low speed until combined, about 1 minute; scrape bowl
Dump-in the sugar mixture and start mixing. When it's fluffy, it's done
  1. Add pumpkin, vanilla, and lemon juice and beat at medium speed until combined, about 45 seconds; scrape bowl
Still fluffy, but now orange
  1. Slowly add eggs and beat at medium-low until incorporated, about 1 minute; scrape bowl
Crack the eggs into a bowl, and then slowly incorporate them into the cream cheese mixture while it's beating. When all the eggs are added, beat until the mixture is homogenized. It will be shiny
  1. Add heavy cream and beat at low speed until combined, about 45 seconds
Pour-in the cream. It will lighten the mix
  1. Using rubber spatula, scrape bottom and sides of bowl and give final stir by hand
Get anything that wasn't thoroughly mixed by the mixer
  1. Set springform pan with cooled crust on 18-inch-square doubled layer heavy-duty foil and wrap bottom and sides with foil; set wrapped springform pan in roasting pan. Pour filling into springform pan and smooth surface
Begin with a roasting pan and your springform pan w/ cooled crust (note: the rust and schmutz in the roasting pan is fine - we're not going to eat from it). Next, get a long piece of wide heady-duty foil and fold it in half. Put the springform pan on top

Fold the foil edges up the sides of the springform pan and then form them around the side. Put the pan in the roasting pan and put that whole thing on top of the stove. Reason: we're going to cook this in a water bath - the foil will prevent the water from getting-into the cheesecake

Slowly pour-in the cheesecake. It will almost reach the top - wow, that was close
  1. Set roasting pan in oven and pour enough boiling water to come about halfway up side of springform pan
Open the oven, slide out the rack, put the roasting pan on the rack. Fill the roasting pan with water (teapot, yo) - you want the water to reach halfway up the side of the springform pan. Carefully slide the cheesecake into the oven. I said CAREFUL, dammit!
  1. Bake until center of cake is slightly wobbly when pan is shaken, and center of cake registers 145 to 150 degrees on instant-read thermometer, about 1 1/2 hours
  2. Set roasting pan on wire rack and cool until water is just warm, about 45 minutes. Remove springform pan from water bath, discard foil, and set on wire rack; continue to cool until barely warm, about 3 hours. Wrap with plastic wrap and refrigerate until chilled, at least 4 hours or up to 3 days
After 90 mins, remove the roasting pan from the oven and put it on the stove to cool (or wire rack). To help prevent cracking, you can use a knife to gently loosen the cheesecake from the side of the pan. Note: the cheesecake is puffed-up when it comes out of the oven - this will subside

After it's cooled on the rack and is ready for cold storage, put some plastic wrap on top and park in fridge until ready. Oh, beautiful...

SERVING SUGGESTIONS
  • Cut a slice, put it on a plate, and top with some kick-ass Brown Sugar and Bourbon Cream (recipe below)
Here's what it looks like when you remove the springform pan ring. Check-out that top: no cracks. I am a cheesecake wizard! (is that a thing?)

FAQs
  • I don't have a springform pan, do I need one? >> Yes. Go get one
  • Drying the canned pumpkin - are you serious? >> Yes. There is a lot of extra water/moisture in the pumpkin, which will affect the texture of the finished cheesecake
  • Room temp eggs & cream cheese. Why? >> For the cream cheese, it will make it easier to mix. For the eggs, it will fluff-up better
  • Do I really need to wrap my springform pan with foil? >> Yes. Even the best springform pans will leak - allowing that water to get into your succulent cheesecake
  • Why should I put the cheesecake and roasting pan in the oven before I add the boiling water? >> Because the water makes the rig super-heavy. Putting the pan on the rack and then adding water will make it easy - just slide it into the oven and you're done
  • Should I take the temperature of the cheesecake to check doneness? >> You can. I've cooked a number of these, so I know what to look for - slight jiggle in the middle and it's done
  • What if it cracks? >> It's very common for the cheesecake to crack - it happens sometimes. Just use that as the first cut, and everything will be ok. Cooking at a low temp (325) and then allowing to cool slowly (first by leaving the cheesecake in the water and then cooling out of the water) will help prevent cracking, but it can still happen

Brown Sugar & Bourbon Cream
Makes ~3 cups

INGREDIENTS
  • 1 cup heavy cream
  • ½ cup sour cream
  • 1/3 cup packed brown sugar
  • 1/8 teaspoon salt
  • 2 teaspoons bourbon
Hello bourbon - it's a party now!

INSTRUCTIONS
  1. In a bowl, whisk all ingredients until combined. Cover with plastic wrap and refrigerate until ready to serve cheesecake, at least 4 hours or up to 24, stirring once or twice during chilling to ensure that sugar dissolves.
Dump ingredients, stir with whisk until combined

Pour into something for storage for a few hours (I use a 20oz glass beer mug), be sure to get all that left-over sugar, and cover with plastic wrap. Park in the fridge for 4-24 hours
  1. When ready to serve cheesecake, beat mixture with whisk attachment at medium speed until small bubbles form around edges, about 40 seconds; increase speed to high and continue to beat until fluffy and doubled in volume, about 1 minute longer. Spoon cream on individual slices of cheesecake.
If you don't have a mixer, or access to a mixer at your in-laws house, pour the cream into a larger bowl and then whisk until soft peaks are formed. You don't want this to be a stiff whipped cream - you want it to ooze a little bit. Oh, that's good...

FAQs
  • Seriously, 2 tsp of bourbon? >> You can go up to 3 tsp - but don't add too much, this is supposed to come-together as a whipped cream
  • Bourbon?!? What about the children? >> Your kids need a some bourbon - just to get through the day

Sunday, October 13, 2013

Recipe: Race Day Scrambled Eggs & Bacon

Today is the annual Chicago Marathon: booyah?! I'm not running (no chance), but I do want to celebrate the occasion by sitting in my chair and watching people run - for a little while, at least.

You know how runners like to carb-load the night before the race to gain/store energy? Well, for watching, I recommend a fat/protein load. Let's get to it!

Mmm, just what the cardiologist ordered

Race Day Scrambled Eggs & Bacon
Serves 4

INGREDIENTS
  • 1/2 pound bacon, cut into small pieces
  • 8 eggs
  • 1 cup half & half
  • 1 Tbs butter
  • salt & pepper
INSTRUCTIONS
  1. For the bacon, it's best to begin with a frozen slab of bacon. Thaw slightly in the microwave (defrost setting, ~2 minutes) and then cut into 1/4" planks. This is way easier to do when frozen. If you're starting from thawed bacon, cut into 1/4" pieces. If your knife is not ninja-sharp, this will be an epic pain in the ass.
  2. Over medium-high heat, cook bacon in a large nonstick skillet until brown and crispy
  3. While the bacon is cooking, crack the eggs into a bowl, add half & half, and whisk whisk whisk it up
  4. When bacon is complete, remove from the pan with a slotted spoon and put onto a plate lined with paper towels (this will mop-up some of that bacon grease). Dump the bacon grease into the sink. Leave some grease in the bottom of the pan - just the amount that doesn't pout out.
  5. Return the skillet to the cooktop, add butter, and allow to melt. When butter has melted and stopped foaming, pour the eggs into the pan. Begin stirring - allow those curds to form on the bottom. Oh yeah.
  6. When the eggs have mostly set, add the bacon and cook together. Add a little salt & pepper for flavor. Cook until the eggs are set, but not too tight.
  7. Done - eat 'em up.
NOTES:
  • Seems like a lot of half & half, are you sure? >> Yes. Half & half is better than milk. My scrambled eggs are the best because I use the right dairy. Yours can be good too if you just do what I say.

Sunday, June 16, 2013

Wurst Father's Day Ever

Father's Day checklist:
  1. Eat delicious food
  2. Have a few beers
Done and done.

For dinner, the Badass wife thought about hot dogs on the grill and I thought about bratwurst. Turns out we both won.

2-stage fire. Notice how the coals are under the bratwurst but not under the hot dogs.
This allows you to char at times and "bake" at other times

Wurst Father's Day Ever
Serves 4 + dog + leftovers

INGREDIENTS
  • Hot dogs
  • Bratwurst
  • 2 large onions, sliced in half and then sliced thin
  • Kosher salt
  • 2 Tbs dry sherry*
  • 2 Tbs butter
  • Sausage fixin's (buns, ketchup, mustard, etc.)
INSTRUCTIONS
Meats
  1. In your 15+ year old Weber kettle grill, build a 2-stage fire
  2. Place the hot dogs and bratwurst on the hot side and char for 1-2 minutes
  3. Flip and char the other side for an additional 1-2 minutes
  4. Move to the "cool" side, cover the grill, and walk away. For 5 minutes
  5. Return to grill, flip sausages, cover, and walk away for a few more minutes
  6. Evacuate sausages to a plate
Sauteed Onions
  1. Heat a saucepan to medium high heat
  2. Add butter and allow to melt
  3. Add onions and sprinkle-on ~1-2 tsp of kosher salt
  4. Cover and cook for ~5 minutes
  5. Check the onions, they should be softened, but probably not browning - that's fine. Stir, cover, and walk away for another 3-5 minutes
  6. Check the onions. They should be beginning to brown. Stir, cover, and return every few minutes, stirring and checking. Drop the heat to medium
  7. When the sides of the saucepan are starting to get brown with cooked onion, add 2 Tbs dry sherry and deglaze. This will loosen the brown bits and return those bits of flavor to the onion. Cover and cook for another few minutes.
  8. Check the onions, when dark golden color, the onions are done. Evacuate to a bowl and wait for dinner time.
After dinner there were still a few spoonfuls of onions left

SERVING SUGGESTIONS
  • Bratwurst + bun + onions + dark mustard. Done.
  • Leave the hot dogs for the kids (and the dog - what a lucky dog!)
RECIPE NOTES

Tuesday, May 28, 2013

Badass Lentil Salad

Never in the history of food have the words "badass," "lentils," and "salad" been thrown together. Until now.

Badass Lentil Salad
Makes enough for ~6 lunches

Lentil salad at work. Glamorous, no?

INGREDIENTS
  • 1 lb Pardina Lentils
  • 2 Boneless Chicken Breasts
  • 1 English (seedless) Cucumber, quartered and sliced
  • 3 Sweet Bell Peppers (assorted colors), sliced thin
  • 1/2 Red Onion, sliced thin
  • 1 can Chick Peas or Garbanzo Beans (whichever available)
  • Handful of Italian (flat leaf) parsely, chopped fine
  • 1/2 bottle Italian Salad Dressing
INSTRUCTIONS
  1. Cook the lentils
    • Add the lentils to a medium saucepan (make sure there are no sticks or stones hidden in your lentils) and cover with water by 1 inch
    • Heat until boiling. Add ~2 Tbs kosher salt (or 1 Tbs table salt)
    • Drop the heat and simmer until al dente (tender but toothsome)
    • Drain in a mesh strainer, rinse with cold water, and allow to drip for a few minutes. Put cooked lentils in a huge bowl
  2. Cook the chicken
    • In a nonstick skillet, heat ~1 Tbs of oil (I used olive oil) over medium-high heat until shimmering
    • Add chicken breasts, sizzle, and cover. Cook for ~5 minutes
    • Flip the breasts, sizzle, and cover. Cook for another ~5 minutes (check for chicken doneness - if not quite cooked, cut in-half lengthwise and cook a little longer)
    • When done, evacuate to a plate, allow to cool until ok to touch
    • Slice into very thin fork-sized pieces - add to bowl of lentils
  3. Prepare the veggies
    • Peppers: cut-off the four sides of each pepper (12 sides total). Then slice into very thin pieces (see pepper detail)
    • Cucumber: cut-off either end of the cucumber, peel "most" of the dark green skin, cut in half lengthwise and then half again (result: 4 long quarters of cucumber), and then slice thinly
    • Red onion: cut-off top and bottom of onion and then cut in half (pole to pole). Cut onion half in-half again (pole to pole) and slice thin. Result: thin quarter-onion rings. In a mesh strainer, rinse onion under cold water - allow to drain.
    • Chick peas: drain can of beans into mesh strainer, rinse thoroughly with cold water.
    • All veggies: when fully prepared, add to giant lentil bowl.
  4. Add Italian dressing and parsley
  5. Stir. Add a little salt, if needed
  6. Done.
SERVING SUGGESTIONS
  • Scoop into a bowl and eat with a spoon. It's the least glamorous thing you'll eat - except spray cheese from the can standing in-front of the fridge at 2 in the morning. That's less glamorous.
FAQs
  • Is this a joke, or something? >> Sadly, no. In an effort to reduce carbs, I have turned to the lowly lentil. It's high protein and low carb and a good staple when trying to put-together a weight-loss lunch for the office. Cheap and easy.
  • What are Pardina lentils? >> These lentils are more robust. When cooked, they stay together. Most other lentils completely disintegrate when cooking and must be handled differently.

Saturday, May 11, 2013

Badass Mother's Day (crepes for my lady)


Hey, it’s Mother’s Day again, and your wife refuses to leave the bed until the children serve breakfast in it – what do you do?  Well, if you’re like me, and you don’t trust the children to NOT burn-down the house, then it’s downstairs to the crepe-making place…

Mmm, crepes...

Crepe Batter
Makes enough for ~12 8” crepes

INGREDIENTS
  • 2 eggs
  • 3/4 cup milk
  • 1/2 cup water
  • 2 Tbs sugar
  • 1 cup flour
  • 3 Tbs melted butter
INSTRUCTIONS
  1. Combine all ingredients and mix vigorously.  Be sure to evenly blend all ingredients into a homogenous mixture.  Park in the fridge for ~30 minutes – this will allow the mixture to come-together as one.
  2. Heat a small (8”) non-stick pan to medium.  Add a small amount of butter to the pan (for lubrication purposes).  Ladle an amount of crepe batter that will evenly cover the bottom of the pan – to an approximate 1/8” thickness.  Cook for up to a minute – just enough time to “set” the bottom of the crepe.  Flip the crepe, and cook the other side (the second side should take less time – try 30 seconds to start).
  3. Remove the crepe from the pan, place on a plate and cover with a kitchen towel (if planning to serve warm).  When you’ve amassed enough crepes, you may fill and serve.
SERVICE OPTIONS
  • Spoon some filling down the center of the crepe and roll-up like a burrito.  There’s really no wrong way to fill a crepe. (filling options listed below...)
FAQs
  • Crepe Technique?? >> the real ‘trick’ about crepes is the technique.  You want to allow the batter to spread itself throughout the pan evenly.  I ladle an appropriate amount of batter in the pan, and swirl it around until it’s even.  Practice with the first couple crepes – there should be enough for you to experiment.  If this is your first crepe making adventure, make a double-batch with the express intent of sacrificing an entire legion of misshapen breakfast quick-breads.
  • Sugar?? >> this is a recipe for ‘sweet’ crepes.  There are such things as ‘savory’ crepes, but that is not my concern here – just remove the sugar if you want to fill it with BBQ chicken or something like that...

Berries & Cream Filling
Good for crepes, and just about anything else

INGREDIENTS
  • 1 cup heavy cream
  • 2 Tbs granulated sugar
  • 1 tsp vanilla
  • Berry assortment (strawberries, blueberries, raspberries, blackberries – you choose the mix)
INSTRUCTIONS
  1. Rinse all berries.  If using strawberries, cut them to match the size of the other berries.  Add rinsed/cut berries to a bowl and add 1 Tbs of sugar; mix.  This will help macerate the berries, which will force them to release some juices.  Trust me, this is what you want.  Put the berries in the fridge for 30+ minutes.
  2. In the bowl of your stand mixer, add the heavy cream, 1 Tbs of sugar, and vanilla, and beat with the whisk attachment until stiff peaks form.  No stand mixer?  Change ‘stand mixer’ to ‘large bowl’ and ‘whisk attachment’ to ‘whisk under human power.’  It will take longer and far more effort by hand, but the taste will remain the same.

Chocolate & Banana Filling
Another winning combo

INGREDIENTS
  • 2 bananas, sliced
  • Jar of Nutella (chocolate hazelnut spread)
INSTRUCTIONS
  1. No prep – just spread the Nutella on your crepe, and layer bananas inside – completely idiot-proof.

“Boston Cream” Filling
Holy shit! This was new for 2012, and OMIGOD it was a hit. Basically, it’s Nutella and pastry cream together. Wow. 

INGREDIENTS
  • 2 Cups milk
  • 1/4 Cup + 1/3 Cup granulated sugar
  • 1 egg + 2 egg yolks
  • 1/4 Cup cornstarch
  • 2 Tbs butter
  • 1 tsp vanilla
  • Jar of Nutella (chocolate hazelnut spread)
INSTRUCTIONS
Pastry Cream
  1. In a small saucepan, cook 2 Cups milk and 1/4 Cup of sugar until the milk boils – then no further.
  2. While the milk is heating, mix the whole egg and two egg yolks with a whisk until creamy and lightened in color. Add the 1/3 Cup sugar and 1/4 Cup cornstarch and whisk until fully blended and smooth.
  3. When the milk begins to boil, remove from the heat and slowly introduce the boiling milk to the eggs. Slowly because if you pour all that heat into the eggs, you’ll scramble them – no good. What you’re doing is called “tempering,” and it’s a way to introduce something hot into something cold without “cooking” the cold thing. I use a ladle and do it one ladle-full at a time.
  4. When all the hot milk has been incorporated, pour the whole thing back into the pot and cook (gently) for a few minutes, or until the mixture thickens. How long will this take? Oh, maybe a few DAMN SECONDS, holy shit – I turned my back on it yesterday, and then had a thick pot of stuff – luckily it wasn’t ruined, but stay close: this is going to set-up quickly.
  5. When thickened, turn-off the heat, add the butter and vanilla and stir to melt the butter.
  6. Pour into a bowl, cover with plastic wrap (directly touching the cream – to prevent a “skin” from forming) and park in the fridge until cooled. This will take 1+ hours.
Crepe assembly
  1. Like in the chocolate-banana crepes, smear a crepe with Nutella spread and spoon-on some pastry cream.
  2. Roll-up like a crepe and put on a plate. 

Friday, December 14, 2012

Recipe: Badass Appetizer Meatballs

These are the meatballs that everyone expects me to bring to every damn family holiday gathering. So, beware: if you make and bring these, you will be signing-up for a lifetime of holiday meatball delivery. Which is good, because they are awesome, but bad because we don't want to owe anything to anyone. I walk alone...

Parsley optional

Badass Appetizer Meatballs
Serves 6? I suppose this depends how fat and hungry your family is

INGREDIENTS
  • 2 lbs Breakfast pork sausage (1 lb regular, 1 lb spicy)
  • 1/3 Cup Bread crumbs
  • 1 Egg (large, of course)
  • 1 Cup Ketchup
  • 4 Tbs Brown sugar (dark is the only brown sugar you need) NOTE: 4 Tbs = 1/4 Cup
  • 2 Tbs Vinegar (I prefer apple cider vinegar, but white works here too)
  • 2 Tbs Soy sauce
INSTRUCTIONS
Sauce
  1. In a large pot, put ketchup, soy sauce, brown sugar, and vinegar
  2. Stir to combine
  3. Heat lightly until bubbling (this will happen much faster than you think)
  4. Done
Meatballs
  1. Combine meat, egg, and breadcrumbs and mix with your hands until homogeneous. Pro tip: leave the meat out of the fridge for a while (like 30 minutes) to take-away some of that chill. Mixing cold meat is not as fun as mixing room temperature meat.
  2. Roll into balls - ping pong ball size works best
    1. Grab a little meat with your fingers
    2. With two flat palms, "roll" the meat in your hands until it shapes into a ball
    3. Put perfectly formed meatball down onto a plate or something
  3. In a large non-stick skillet, brown your meatballs. You don't need any oil because the meatballs bring their own fat (thank you, pig, for being so thoughtful)
Cooking meatballs in the skillet. 
Note the browned side and going-back to brown the other two sides
  1. As one side browns, be sure to turn the meatballs to brown the other sides. I find that for this part, a meatball has three sides.
  2. When complete, put the cooked meatballs into the sauce mixture
  3. Heat the meatballs in the sauce for ~20 minutes or until cooked through and the sauce sticks like a glaze
Cook the meatballs in the sauce. This is where the marriage begins
  1. Done. Put the meatballs into an efficient and effective transport container that can be used to gently reheat your balls at the appropriate eating location
Meatballs in the crock pot ready to bring to the party. 
Oh, I should try one? Don't mind if I do...

HOW TO EAT
  • Pierce with a toothpick and put in your mouth. Pro tip: bring meatballs AND toothpicks to the party, You'll be the toast of the town
RECIPE NOTES
  • What if you have too many balls to fit in the skillet all at once? >> I have the same problem: I have too many balls. I cook my balls in two batches in the skillet - no worries.
See? Here's me cooking the second batch of meatballs (right) 
as the first batch bathes in the sauce (left). Multitasking is badass!
  • This doesn't seem like enough balls to feed my hungy hungy hippos. Any ideas? >> When I make these for a party, I never make only one batch - I make two. BUT, I have found that you can't just make a monster vat of meatballs and sauce. The problem is that if you try to cook 4 lbs of meatballs in the sauce, the meatballs on the bottom will disintegrate under the weight of the top balls. Best to make this in two+ distinct batches. Cleaning your pots and pans in the middle. Mix the two+ batches in the crock pot. That's bad ass!

Monday, April 30, 2012

Recipe: Badass Beef Sandwich


This started as a neat idea and ended as a religious experience*. Try this beef sandwich, and your world view probably will be altered.
* Offer does not apply to Hindus and vegetarians.

See the layers: the Gorgonzola top, the beefy middle, the oniony bottom, and the crispy/buttery roll. I think I'm going to cry... again. Notice the salad (added for health reasons)


INGREDIENTS
  • Heat 'n eat sliced beef (like, 2+ lbs?)*
  • 4 oz. Gorgonzola cheese
  • 1/2 Cup Sour Cream
  • 4 Medium Onions, cut into 1/4" half-rings
  • Salt & pepper
  • 1 Tablespoon Red Wine Vinegar
  • Chicken Stock
  • 1.5 teaspoons Sugar
  • Italian Sandwich rolls
  • Butter

INSTRUCTIONS
Onions 
Cooked onions will eventually become this color.
This means they are sweet and delicious.
  1. Cut the onions in half (pole to pole) and then slice into 1/4" half-rings
  2. In a medium saucepan, over medium heat, cook the onions in ~3 Tablespoons butter and 1 teaspoon salt until beginning to brown (~10 minutes)
  3. Deglaze the pan with ~1/2 cup chicken stock. This will get the browned pieces of onion off the bottom of the saucepan AND chicken stock tastes good.
  4. Continue to cook the onions until they get browner and more delicious (~20 more minutes)
  5. Add ~1 Tablespoon vinegar and 1.5 teaspoons of sugar and stir to combine - cook for another 5-10 minutes.
  6. Done. evacuate the onions from the pot (try a bowl, genius) and save for sandwich construction. Be sure to taste those onions - delicious, no?
Gorgonzola Spread

  1. Pour the blue cheese into a bowl
  2. Top with sour cream
  3. Mash and stir: the goal is to make the cheese and sour cream into one glorious paste of deliciousness
  4. Done. Save the spread until later.
Rolls
  1. Cut the rolls in-half the long way (think hero sandwich, yo)
  2. Spread the rolls with butter
  3. Put the rolls, butter-side-down, on a hot griddle and cook. The goal is to add some buttery crunch to that bread. You may need to press-down on the rolls to get them to brown (see the mason jar in the pic)
  4. Done, prepare to make sandwiches
Meat
  1. You bought heat 'n eat meat for a reason: ease of preparation.
  2. Heat yo meat, follow the instructions on the package. Usually it means heat until hot, but don't boil. Why no boil? Boiling will toughen your tender meat.
  3. When done, turn-off the stove and get ready for admission to beefy heaven.
Assembly
  1. Open your buttery Italian roll
  2. On the bottom, spread some onion jam - OMIGOD, it's already awesome!
  3. Top with meat - add some juice, I will allow it
  4. Spread Gorgonzola spread on the other roll
  5. Top your meat with the cheesy roll
  6. Eat. Be sure to sit down - it's that good.
  7. You're welcome.
Sandwich assembly station
Efficiency is badass!

FAQs
  • Why not homemade Italian beef? >> That's a whole other recipe. Instead, I rely on my excellently sourced food purveyors here in the greater Chicagoland area. We have the finest foodstuffs the world has to offer, and they're all at my fingertips.
Vienna Beef. Excellent. Get some.
  • No hot peppers? >> I made this last night and added hot giardinera. It was good, but a little too much for this sandwich. For a spicy beef sandwich, just do the beef, hot giardinera, and Provolone cheese. Baptize that sandwich in the au jus - a delicious Italian beef.

Badass Music to Cook By

Hey, fat kid, do yourself a favor: next time you're cooking, blast the stereo to something that will piss-off the neighbors:

Clutch

It's badass. Need a hint? Check-out Red Horse Rainbow

Tuesday, April 3, 2012

Recipe: Shrimp 'n Grits


Famous lowcountry fare, but I’m from Chicago – what up?

Shrimp 'n grits - green beans optional

INGREDIENTS
  • 1 1/2 Cups grits (I like ‘em yellow)
  • 2 Cups heavy cream
  • 2+ Cups chicken stock/broth
  • 1 tsp Old Bay seasoning
  • 8 oz cheese*, shredded
  • 1 lb raw shrimp (31-40), peeled and deveined (31-40 means there are 31-40 shrimp per pound - your fishmonger knows all about this...)
  • 1/3 Cup green onions, sliced on the bias (that means diagonally)
  • 1/4 Cup red bell pepper, brunoised*
  • 1 15 oz. can Diced tomato
  • 1 stick (4 oz.) butter, cut-up into pieces
  • Hot sauce
  • Salt & pepper
INSTRUCTIONS
Grits
  1. In a large stockpot, pour-in the chicken stock/broth and Old Bay seasoning and bring to a simmer. Add grits and heavy cream and whisk to combine. Cook until the liquid is absorbed and the grits have lost their graininess. If you use fine textured cornmeal, this will take a few seconds and you’ll be like, “WTF!?” If these are slow cooking grits, this will take 15-20 minutes.
  2. When grits are complete, drop the heat, add the cheese, and stir to combine. Set aside.
Shrimp
  1. In a nonstick sauté pan over medium high heat, add 2 tsp canola oil. Add the shrimp in one layer and cook for ~4 minutes, or until pink. Flip the shrimp, add the tomatoes, peppers, and green onions and cook for ~3 more minutes.
  2. Turn-off the heat, add the butter and allow to melt. Add hot sauce to taste (oooo-e! that’s some spicy!). Stir to combine as one glorious topping.
  3. Serve it up! Enjoy with some sweet tea, moonshine, or other southern drink.
HOW TO EAT
  • Plop-down some grits on a plate and top with a generous spoonful of the shrimp. Be sure to get a lot of that buttery liquid: oh, that’s the stuff!
RECIPE NOTES
  • Cheese? Why is there an asterisk next to the cheese? >> There are a lot of cheeses that will fit the bill here: sharp cheddar, mild cheddar, Havarti, etc. When I last made this, I use Havarti, and it was excellent. Any kind of cheesiness will be good – go with what you like.
  • Seriously, brunoised? WTF? >> That’s a fancy French word for diced small and uniform. The red pepper dice needs to be small to ensure that the pieces cook quickly and look pretty. Pretty food is badass? Sure.
  • A note on peeling and deveining shrimp >> Being from Chicago, there are no indigenous shrimp in my history – I had to learn like any of you people. It’s simple, really: 1. peel the shrimp (just rip-off the peel and tail – there’s no trick here), 2. with a sharp (and I mean SHARP) knife, insert gingerly into the concave portion of the shrimp (it’s belly, as it were) and cut the entire length, 3. While rinsing under cold water, free the vein and rinse it down the drain, and then 4. Drop your cleaned shrimp into a bowl of cold water. See? Easy.

Saturday, February 18, 2012

Recipe: Badass Steak!

I can't believe it's taken this long, but we finally have STEAK!


Now, there are a lot of ways to make a steak, and most of them are correct (meaning that you really have to fuck things up royal to make a steak taste bad), but I have the BEST WAY TO COOK A GODDAMN STEAK RIGHT HERE!

INGREDIENTS
  • Steak(s)
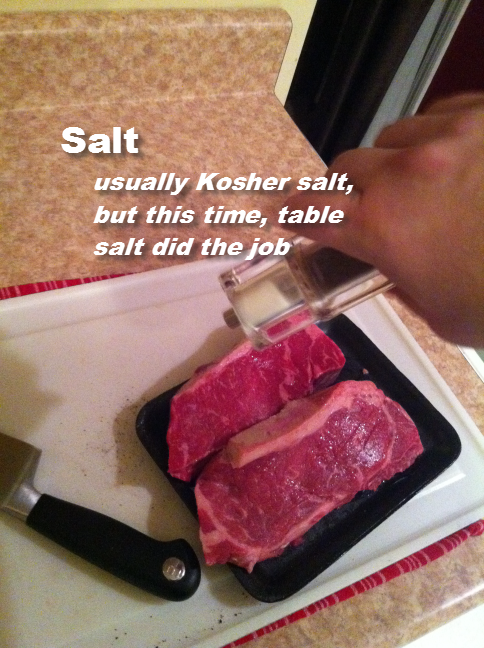
  • Salt
  • Pepper
  • Canola oil
INSTRUCTIONS
  1. Pre-heat your oven to 500 degrees (that's right, 500 motherfucking degrees!), which will take 15-30 minutes
  1. Remove the steak(s) from the fridge, liberally salt & pepper, and rub with oil. Allow to rest until I tell you otherwise.


  1. When the oven has reached 500, and been there for 5-10 minutes, throw your cast iron skillet into the oven for 5 minutes - you want to get that thing red-fucking-hot!
  2. After 5 minutes, crank a burner to high heat, remove the skillet from the oven (use a mitt or gloves) and put it on the burner, then place the steak(s) into the skillet - witness the sizzle, which is good!
  1. DON'T FUCKING TOUCH, for 3 minutes.
  2. Flip and cook the other side(s) for 3 more minutes
  1. Put in the 500 degree oven for 3 minutes
  2. Open the oven, flip the steak(s), and cook for another 3 minutes
  1. Remove, evacuate to a strategically placed cutting board, tent with foil, and rest for 3 minutes
  1. Cut on the bias and serve to your special lady friend
Serving Suggestion
  • Serve with badass mashed potatoes and a vegetable (we used frozen corn tonight)

FAQs
  • Why a cast-iron skillet? >> Because you can heat that thing on the sun and not have to worry about warping or melting Teflon or any of that bullshit. Plus cowboys used to cook on it, so it's totally badass!
  • Seems too easy - what about Bearnaise, Au Poivre, or other fancier finishes? >> Fuck off, this is badass.