Monday, June 29, 2009

Recipe: Mashed Potatoes

This isn't really a main dish (unless you're a goddamn lunatic), but I'll feature delicious side dishes too. It's the perfect thing to go with a steak or some meatloaf. Able to support a ladle-full of gravy or half-stick of butter equally. Now, go get yourself some!
One plate for mashed potatoes - another plate for anything else


INGREDIENTS
  • Baking Potatoes (they're brown and they're big – also known as “Russet” or “Burbank”)
  • Kosher Salt
  • Half & half – at least 1 cup

INSTRUCTIONS
  1. Peel the potatoes. Generally, I peel potatoes in the sink with the water running slowly. I use the water to rinse-off the dust and small pieces of peel that stay on the potato – it’s faster for me. But I whole-heartedly recommend turning “potato-peeling” into some forced-work activity for your children just like in the Army. There’s no reason the youth of today can’t participate in proven character-building exercises.
  2. Quarter the potatoes – which means cut them into four equal parts. Do this because it will make the potatoes cook faster than trying to boil a whole potato, but don’t cut into smaller pieces because the flavor will “wash-out” of smaller pieces boiling in a big pot of water. Generally, you’re looking for pieces that are roughly the size of a golf ball, so if you have small potatoes, just cut into two pieces. Oh, do whatever the hell you want.
  3. Place the potatoes in a large pot and sprinkle-on 1-2 Tbs of Kosher salt. Add water to the pot - just to cover the potatoes. You want just enough water to cover, but not so much that they’re water-logged.
  4. Lid-up and add heat. Bring to a boil and then back-off to a medium-low heat. Watch carefully because the starch in the potatoes will combine with the water to make persistent bubbles. These bubbles will rise and rise to the lid and, if there isn’t enough room in the pot, will boil-over and make an awful god damn mess all over your cook top. So, be sure to watch, and lower the heat if it’s getting out of control. You can also skew the lid so that some of the steam escapes the pot – this will help prevent nasty boil-overs.
  5. The potatoes should be done at 20 minutes, but they might be done a little sooner or a little later. You can check by inserting a paring knife into the potato. If it goes-in cleanly, the potatoes are finished cooking.
  6. Drain water from the pot.
  7. There are two methods for mashing:potato ricer
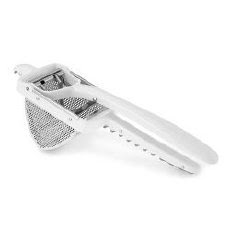
    • Ricer method: this is the preferred way. Takes a little longer, but it's worth it!
      1. Buy a “ricer.” It’s a contraption with two handles and a perforated metal “cage.” Squeezing the handles will squish whatever’s placed in the cage through the holes. In the case of potatoes, they will come out of the ricer without lumps – the most perfectly creamy potatoes of your life. Ricers are generally ~$20 at a kitchen place.
      2. Put the drained potatoes into a separate bowl
      3. Use the ricer and squish the potatoes back into the cooing pot.
      4. Keep ricing until the potatoes are finished.
      5. Good job!potato masher
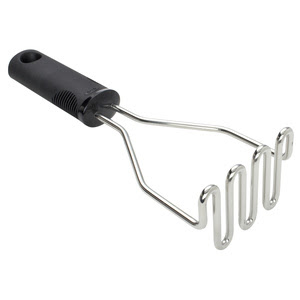
    • Mashing method: these are delicious too. Easier than ricing, but a more "down home" texture (i.e. there will be a few lumps, but they'll be delicious lumps)
      1. Put the drained potatoes back in the pot.
      2. Use the potato masher.
      3. Stop mashing when the texture makes you happy.
  8. Add ~1 cup of half & half and stir. You may need to add more depending on how dry the potatoes are
  9. Finished.

FAQs
  • Baking potatoes? I thought this was “Mashed Potatoes?” >> Ok, there are two general characteristics to potatoes: waxy & starchy. “Brown” potatoes are more starchy and red potatoes are more waxy. For “mashed” potatoes, you want that starch. People say “baking” potatoes because they look like the prototypical baking potato, and most people are stupid and can’t think of terms like “starch” at the grocery store – they need a visual cue to buy the correct produce (please take me to a smarter place...)
  • What about butter & milk? >> Essentially, that’s half & half: half cream and half milk. Why are you ruining my time-saving step?
  • What about an electric mixer? >> Yeah, those are the potatoes I had all throughout my childhood, and they were ok. They weren’t great, just ok – I used to think they were great, and then I made these... Just do what I tell you, and you’ll be happy.

Wednesday, June 24, 2009

Recipe: Ribs

This is the first recipe because it's a badass God damn recipe!

Dude, these ribs rock the house!! They take hours, but they're pretty low-work hours, so that's a plus!


Ribs

INGREDIENTS
  • Rib Rub (recipe follows)
  • Baby Back Ribs
  • Tin Foil
  • BBQ Sauce (your choice - I prefer Open Pit)
INSTRUCTIONS
  1. Rinse the ribs under warm water and pat dry with a wad of paper towels.
  2. Sprinkle both sides of the rack o' ribs with the rib rub. You don't need to drown the meat in that shit, but get a good even coating. Gently pat the rub to ensure it's sticking somewhat to the meat.
This is a decent amount of rub. Be sure to use your hands and make sure it's sticking to the meat
  1. Wrap the ribs tightly in foil. The WIDE foil works best. My guess is that if you're not using wide foil this time you will be next time!
Ribs weep while cooking. Note how I place the ribs. I want to minimize the mess in my oven.

Collect the sides at the top, and fold/roll down. Done and done
  1. Cook the ribs in a 225 degree oven for four (4) hours. This will gently heat the ribs-through while letting the ribs percolate in the rub. Mmm, that's God damn delicious.
You can fit two racks on a half-sheet pan
  1. Time's up! Take-out the ribs. At this point, the next step is the grill. You can rest the ribs (preferred) and go attend to the heating of the grill, or take them straight to a ready-to-go grill: it's your choice. Personally, I rest them - because I'm lazy.
  2. When it's grillin' time, cut the slabs into manageable-sized pieces (three pieces per slab is about right). Put onto grill (meat-side down first) and then dab the bone-side with some sauce. Cover the grill and walk-away for 5 minutes.
  3. Return to the grill and flip the ribs. Dab the new side with some sauce. You should notice some char now: that's the flavor! Cover and walk-away for another 5 minutes.
  4. Evacuate the ribs to a plate, put-on your eatin' clothes, and get to work. If you did it right, your family will now look upon you more respectfully - but not in my house: my respect level has already been maximized!
FAQs
  • Open Pit? >> Yes, I said "Open Pit," motherfucker*! It's a classic for anyone growing-up in the 70's and 80's, before all the "fancy" sauces hit the market.
  • Grill >> I use a charcoal grill, so it's blazing hot. If you have a gas grill, crank that up to high and prepare to burn!
  • Why are you saucing and rubbing both sides of the ribs when the meat is conveniently located on one side? >> First, because I said so. Second, because you never know what people are going to eat. You might have a crazy carnivore at the table who wants to mouth-love the bones until they're clean and ready to be reassembled in a museum. Probably, though, they're going to be like my kids: eating only the "easy to get-at" meat, and then throwing-away a rib with enough meat to feed a Chinese village...
  • How long do I need to rest the ribs? >> Well, you can rest them for zero minutes, or up to a few hours (I guess). There's no problem with a long rest - they'll get back-up to temperature on the grill. Just keep them in the foil packet. You can easily leave them in the oven (shut-off of course) until you're ready to use them. I'd stay-away from putting them in the fridge unless you're going to use them another day.
  • What happens if they're so tender that a few bones fall-out on the grill? >> Well, you are now the rib master of the house. Go get yourself a reward beer for your troubles (and then another) and just be gentle with the boneless meat - it'll still char-up real nice.
  • Eating >> Have some sauce at the table for those who like more sauce.
NOTE*: I have since tried “Sweet Baby Ray’s” BBQ sauce, and it’s pretty good. I suppose if you were to use that sauce it wouldn't be the worst thing that’s ever happened...


Rib Rub

Power-up this recipe to make more rub. This is just about enough rub for two (2) slabs of baby back ribs.

Finished rub. Mix all ingredients with a fork (pictured)

INGREDIENTS
  • 8 Tbs Light Brown Sugar (tip: 8 Tbs = 1/2 cup)
  • 3 Tbs Kosher Salt
  • 1 Tbs Chili Powder
  • 1 tsp Onion Powder
  • 1 tsp Cayenne Pepper
  • 1 tsp Thyme
INSTRUCTIONS
  1. Mix all together. No shit. Note: use a fork to break-up the brown sugar - it has a tendency to clump together. Don't worry too much if the brown sugar doesn't completely disintegrate, little sugar nuggets will be ok for the ribs - maybe even recommended
FAQs
  • What if I don't have all those ingredients? >> The first three are mandatory - the next three are optional AND customizable. You can go batshit crazy here and invent a new rib rub - just stick with the first three and your last three can be as weird as you want.
  • Storage >> you can make a lot of this, and then put it in a cheese shaker (like me). To keep it from getting nasty, put a piece of wax paper under the cap of the shaker. This should stay reasonable fresh all summer (6 months max). But if it's in the cupboard for 6 months and doesn't get used, you’re disrespecting the institution of ribs, which is bad.

First

Well, this is the first article in the new blog, "Cook Like a Badass." Look for badass recipes, talkin' shit about food, and anything else I can think of that will go along with those things.

About me: I'm a badass who likes to cook. Enough said. On with the blogging!