Friday, December 14, 2012

Recipe: Badass Appetizer Meatballs

These are the meatballs that everyone expects me to bring to every damn family holiday gathering. So, beware: if you make and bring these, you will be signing-up for a lifetime of holiday meatball delivery. Which is good, because they are awesome, but bad because we don't want to owe anything to anyone. I walk alone...

Parsley optional

Badass Appetizer Meatballs
Serves 6? I suppose this depends how fat and hungry your family is

INGREDIENTS
  • 2 lbs Breakfast pork sausage (1 lb regular, 1 lb spicy)
  • 1/3 Cup Bread crumbs
  • 1 Egg (large, of course)
  • 1 Cup Ketchup
  • 4 Tbs Brown sugar (dark is the only brown sugar you need) NOTE: 4 Tbs = 1/4 Cup
  • 2 Tbs Vinegar (I prefer apple cider vinegar, but white works here too)
  • 2 Tbs Soy sauce
INSTRUCTIONS
Sauce
  1. In a large pot, put ketchup, soy sauce, brown sugar, and vinegar
  2. Stir to combine
  3. Heat lightly until bubbling (this will happen much faster than you think)
  4. Done
Meatballs
  1. Combine meat, egg, and breadcrumbs and mix with your hands until homogeneous. Pro tip: leave the meat out of the fridge for a while (like 30 minutes) to take-away some of that chill. Mixing cold meat is not as fun as mixing room temperature meat.
  2. Roll into balls - ping pong ball size works best
    1. Grab a little meat with your fingers
    2. With two flat palms, "roll" the meat in your hands until it shapes into a ball
    3. Put perfectly formed meatball down onto a plate or something
  3. In a large non-stick skillet, brown your meatballs. You don't need any oil because the meatballs bring their own fat (thank you, pig, for being so thoughtful)
Cooking meatballs in the skillet. 
Note the browned side and going-back to brown the other two sides
  1. As one side browns, be sure to turn the meatballs to brown the other sides. I find that for this part, a meatball has three sides.
  2. When complete, put the cooked meatballs into the sauce mixture
  3. Heat the meatballs in the sauce for ~20 minutes or until cooked through and the sauce sticks like a glaze
Cook the meatballs in the sauce. This is where the marriage begins
  1. Done. Put the meatballs into an efficient and effective transport container that can be used to gently reheat your balls at the appropriate eating location
Meatballs in the crock pot ready to bring to the party. 
Oh, I should try one? Don't mind if I do...

HOW TO EAT
  • Pierce with a toothpick and put in your mouth. Pro tip: bring meatballs AND toothpicks to the party, You'll be the toast of the town
RECIPE NOTES
  • What if you have too many balls to fit in the skillet all at once? >> I have the same problem: I have too many balls. I cook my balls in two batches in the skillet - no worries.
See? Here's me cooking the second batch of meatballs (right) 
as the first batch bathes in the sauce (left). Multitasking is badass!
  • This doesn't seem like enough balls to feed my hungy hungy hippos. Any ideas? >> When I make these for a party, I never make only one batch - I make two. BUT, I have found that you can't just make a monster vat of meatballs and sauce. The problem is that if you try to cook 4 lbs of meatballs in the sauce, the meatballs on the bottom will disintegrate under the weight of the top balls. Best to make this in two+ distinct batches. Cleaning your pots and pans in the middle. Mix the two+ batches in the crock pot. That's bad ass!

Thursday, December 13, 2012

Technique: Pie Crust and Recipe: Bacon & Onion Quiche

Bacon & onion quiche. 
Also peas and home-made hash browns. Dinner time

Wait a second... Isn't there already a quiche recipe on this site? Yes, there is, but that was ham and cheese - this is bacon and onion. Big difference? No, but it's a way of revisiting the quiche in general - which is generally a good thing.

So let's begin!

First, let's talk about the differences between the earlier recipe and this one:
  • The pie crust in the earlier recipe called for water and vodka, this only wants water
  • The pie crust in the earlier recipe was made by hand, this was made in a food processor
What does this mean? Sounds like there are a few different ways to make a pie crust. YOU ARE CORRECT! Here's what you want from a pie crust:

A pie crust should be tender and flaky:
  1. Tender: this means a minimum amount of gluten. Gluten is the protein that gives structure to baked breads. It is created/strengthened by working dough. The more you work a piece of dough, the more gluten is created. To maximize tenderness, minimize the dough work. Tender!
  2. Flaky: this means there are layers and layers of the dough. This is done by thin "sheets" of fat separating flour particles from one another. When the dough cooks, and the fat melts away, the sheets of flour are all that remain. Flaky!
The earlier recipe substituted vodka for some of the water in an effort to minimize the gluten. Sounds like a decent idea, but kind of a pain. Also, vodka is for drinking! The new recipe relies on the speed and efficiency of the food processor to minimize the working of the dough and the formulation of the gluten. Let's just agree that the two pillars of a successful pie crust are creating layers of fat & flour and the minimization of the gluten formation. Honor those two tenets, and your pie crust will be A.O.K.

Next, is this bad ass? Yes, proper cooking and science literacy are both bad ass. Otherwise, it's dumb ass.

Bacon & Onion Quiche
Serves 6 (probably, or 4 for dinner and then 2 for left-over breakfast)

Pie Crust

INGREDIENTS
  • 1 1/2 Cups All purpose flour
  • 1/2 Cup Vegetable shortening (aka Crisco)
  • 3 Tbs Cold butter, cut into thin pieces
  • 1/2 tsp Table salt
  • 2-4 Tbs Cold water
INSTRUCTIONS
  1. In the workbowl of your food processor, add the flour and salt, and process until mixed (like 2 damn seconds)
  2. Add the shortening and butter and process in bursts until evenly processed and no fat is individually visible (like 5 pulses)
  3. Through the feed tube, add 2 Tbs of water and process until it comes-together as a dough (like 3-4 seconds)
When the dough comes-together, it will look like this. A dough ball in the processor.
  1. If it doesn't come-together, add a little more water and process until it does (add a small amount at a time - the goal is to add only as much water as the dough needs and no more)
  2. Dump the dough onto your clean countertop (sprinkled with a small amount of flour to keep it from sticking)
  3. Work the dough lightly into a hockey puck shape. Wrap with wax paper (or plastic wrap) and put into the fridge for 1-24 hours. This will rest the dough, allow the fat to re-congeal, and allow the water to hydrate the remaining dry flour in the dough. It needs at least an hour, but more time won't hurt it.
  4. Remove the dough from the fridge and have the pie plate ready
  5. Dust your countertop and your rolling pin with a small amount of flour (like 2 and 1 Tbs respectively)
This is the right amount of flour for your work surface
  1. Deposit the hockey puck into the flour and roll in one direction (from you toward the wall). Then turn the dough 90 degrees and roll again (from you toward the wall). You want to avoid rolling any which way because this will cause some parts of your dough to be thinner than the other parts. Baking is a cruel bitch, and she demands motherfucking precision.
  2. If the dough sticks a little to the counter, toss a little flour under there and keep going. Keep rolling and turning until it's ~1/8" thick and bigger than your pie plate by ~2" all around.
  3. Transfer your perfect dough to the ready pie plate. To do this easily, lightly "roll" the dough around your rolling pin and unroll it into the pie plate. Try to get it perfectly centered, otherwise gently shift it into position. CAREFUL: that pie crust is kinda fragile. If you rip it or something, just push the two parts together - it should mend. This works best if you don't use TOO MUCH DAMNED FLOUR when rolling-out the dough. Too much flour will prevent the dough from sticking to itself for repairs.
Easily move the dough by wrapping it around the pin
  1. Artfully prepare the edges of your pie. I like these best:
    1. Fluted-edge
    2. Crisscross edge
    3. Petal edge
    4. and Rope edge. Save the others for your retirement when you have nothing but time and need to impress the ladies' auxiliary with your home baking skills
Scallop edge: sure it looks nice, but that's a lot of work
  1. Cut a sheet of parchment paper slightly larger than your pie, press the paper lightly to the bottom dough, and add enough pie weights to cover the bottom. WHAT THE?!? Read the note about this step below.
  2. Blind bake your crust at 425 degrees for 15 minutes.
  3. The pie crust is complete and ready for savory fillings.
RECIPE NOTES
  • Parchment paper and whatnot? >> To achieve a cooked bottom crust, we'll need to pre-bake the pie crust. If we just bake it as-is, the bottom will bubble-up because the heat from the bottom of the pie plate will cook the fat and make steam. The steam will have no place to go and will make a bubble. The bubble will eventually cook and set that way - crusty. We need to either 1. keep the bubbles from forming (pie weights) or 2. give the steam an escape route. I prefer using the pie weights, but if you don't have those, "dock" your pie crust before baking. That means pierce it all-over with a fork. Don't go apeshit, just make enough holes for any trapped steam to find an escape route. I prefer a perfectly clean and hole-free bottom crust, but this will be fine for a quiche.
Pie weights on the left; docking on the right. Choose one
  • Why butter and shortening? >> Shortening makes the best flakes but butter tastes better. Using both (more shortening) will allow you to live in both worlds - flaky and delicious. That's also why we added salt: for taste.
Quiche

INGREDIENTS
  • 5 Large eggs (3 whole and 2 yolks)
  • 1+ Cup Half & half
  • 8 oz. Bacon, cut-up into small pieces (like 1/2" or something)
  • 1 Onion, diced
  • 8 oz. Shredded cheese (you choose the type - see note)
  • Black pepper
INSTRUCTIONS
  1. Cook the bacon in a skillet until almost crispy. The texture won't really toughen-up any more in the quiche, so cook it how you like it. For most people, this is just past leathery and short of brittle. Set the bacon aside.
  2. IN THE SAME DAMNED SKILLET, remove about half the bacon grease and cook the onion until tender and translucent (about 5-10 minutes depending on heat). Why use the same skillet? For flavor, dummy. Set the cooked onions aside.
  3. In a 2 Cup glass measuring cup, crack three eggs and then add two egg yolks. Separating eggs is easy:
    1. Crack the egg over the sink (or, if you want to preserve the white, over a bowl)
    2. Carefully separate the shell positioning the yolk in either half
    3. Allow the white to drip away - shift the yolk around in the shell to dislodge as much white (albumen) as possible
    4. Dump the yolk into your 2 Cup measuring cup and repeat
  4. With a fork, violently mix the eggs into a homogeneous yellow mass of fat and protein. Yum.
  5. Add enough half & half to slightly exceed the 2 Cup mark on the glass measuring cup. The goal is slightly more than 2 Cups of liquid. If you're using dry measuring cups, fill it to the top, dump into a bowl, and then add a little more half & half.
See how there's space above the 2 Cup markings?
This is a liquid measuring cup. Use this one.
  1. Add pepper to taste and violently stir some more - until homogeneously combined.
  2. To the pre-cooked pie crust, add some cheese, then some bacon & onion, then a little more cheese, then the rest of the bacon & onion, then the rest of the cheese (it's a cheese-meat-cheese-meat-cheese sandwich).
  3. Pour the egg mixture over the whole thing, slowly. If you're using a shallow pie plate, you might not use all the egg mixture. If you're using a deep pie plate, well, remember that next time and slightly increase all the ingredients to fill-up your bottomless pie bucket of a plate. Sheesh.
  4. Carefully place the quiche into the oven and cook at 350 for ~45 minutes. At 40 minutes, check the quiche by lightly jiggling the dish - if the center doesn't move (or moves very little), the quiche is done. Otherwise, cook a few more minutes and check again.
  5. Allow to cool slightly (like 10-15 minutes) and then cut into wedges and eat.
RECIPE NOTES
  • What kind of cheese should I use? >> That's all about personal preference. I think Swiss goes pretty well with bacon and onion, but so does sharp cheddar. You want something with some flavor - stay away from mozzarella or Monterey Jack.

Tuesday, November 27, 2012

Recipe: Chilaquiles

Holy crap, these were good!

A few years ago, on a trip to Mexico, my wife and I surveyed the breakfast buffet: "Chilaquiles?" What are these things? O MY GOD! They are basically broken day-old tortillas in sauce. In Mexico, they are served for breakfast or brunch with eggs and are a way to use-up the leftover tortillas from the night before.

I WANTED TO RECREATE MY MEXICO MEMORIES, but at dinner time!

Chilaquiles: Wow. Mexican comfort food.

Chilaquiles
Serves 6

INGREDIENTS
  • 12 corn tortillas, cut into fourths or sixths (ideally they have been left on the counter overnight and are stale, otherwise we'll fry them)
  • 1 28 oz can of enchilada sauce (or you can make your own - good luck!)
  • 1 whole chicken (or equivalent parts), shredded
  • 8 oz quesadilla cheese, grated
  • 1 onion, sliced thin
  • 1 15 oz can black beans, rinsed and set aside
  • Cilantro, chopped fine
  • Vegetable oil (I use canola oil - aka rapeseed oil - weird)
  • Salt
  • Various garnishes:
    • Sliced avocado
    • Sliced black olives
    • Limes
    • Sour cream
    • Green onion
    • Radishes

INSTRUCTIONS
  1. Roast the chicken. I cooked a whole chicken in a 350 degree oven for 90 minutes. Liberally salt the inside of the bird and just bake it. You're not going for an artistic presentation - you just want the meat. Allow the chicken to cool and then remove and shred the meat from that chicken. Set aside for later.
  2. In a large saucepan (or pot), add 2 Tbs of oil over medium-high heat until shimmering. Add the onion and cook until tender (about 5 minutes) stirring occasionally. Add the beans and continue cooking for another 5 minutes
  3. Stir in the enchilada sauce and bring to a boil. Add the chicken and simmer for ~15 minutes. The goal is to infuse the chicken with that saucy flavor - BOOM!
  4. Meanwhile, if your tortillas are not stale, pour a large amount* of vegetable oil into a large stock pot and heat to ~375 degrees (that's medium high heat for a few minutes - test with a small piece of tortilla: if it sizzles like you think it should, the oil is ready).
  5. Drop-in a few pieces* of tortilla and fry-up some chips. Be sure to flip them halfway and cook them until they are dark golden (note: I did not say dark brown). Evacuate the chips to a paper towel lined sheet pan. Salt the chips while they are still hot and wet with oil - Oooo, damn, that's good! Try a chip to see how you like 'em fresh. In your face, Tostitos!
  6. Continue cooking the chips while the chicken and beans are cooking in the sauce. If you do it right, they will all be done at the same time.
  7. When the chips and chicken are done, dump the chips into the chicken mixture and stir to combine. Add ~2 Tbs of cilantro for flavor. Don't worry that you are breaking some of your beautiful chips, you're making something that is greater than the sum of its parts.
  8. Pour half the chicken/chip/bean/onion mixture into a 9x13" baking dish, layer-on 2/3 of the cheese, pour the remaining chicken mix, and then sprinkle the rest of the cheese. Sprinkle on some black olives and green onions and maybe some more cilantro if you like. You can also garnish with sour cream, limes, and radish, but I added those at the table.

FAQs
  • Making my own tortilla chips is hard, can I use store-bought? >> No. Next you'll be asking if you can use Fritos or Pringles.
  • How much is a "large amount" of oil? >> Good question. It really depends on the size of your pot. I cooked my chips in ~1" of oil, which was about 2 cups. That was not really enough, but I managed ok. I recommend you use a little more oil, but you don't need to fill a vat with a gallon of oil, and have an oil disposal project after dinner.
  • How many chips should I fry at once? >> Again, this will depend on the size of your pot. I recommend that you only put as much as will fit in one layer on top of the oil. For me that was 8 chips.
  • What is quesadilla cheese? >> It says so on the label, but you want a mild easy-melting cheese. I guess you can use Monterey Jack if you need to

Saturday, November 10, 2012

Recipe: Chicken Pot Pie

Hi friends,

When you want some pot pie, you're telling everyone:
GIVE ME MEAT AND PIE CRUST TOGETHER!
Let's talk about how to make your wishes come true.

The way I see it, there are two ways to make a pot pie:
  1. Spend all day cooking something that will impress even the toughest judges from Next Iron Chef
  2. Make something quick and good that will leave you fully satisfied
Today, we'll focus on #2

Chicken, sauce, veg, and crust. Boom.

INGREDIENTS
  • 1 pie crust (recipe below)
  • 2-3 bone-in chicken breasts
  • 1 lb bag of frozen mixed vegetables
  • 1/2 cup flour
  • 2 cups chicken broth
  • 4 Tbs butter
  • Poultry seasoning (preferred) OR thyme
  • 1/4 cup half & half (optional)
  • Salt & pepper (yadda yadda yadda)

INSTRUCTIONS
  1. Clean and rinse your chicken breasts, pat dry with paper towels, and place into a shallow baking dish (I use a pie plate). Sprinkle-on some salt and pepper and roast in a 400 degree oven for ~25 minutes. When the chicken has finished cooking, remove the skin and shred the chicken meat into small pieces - the size of piece you want to eat in a pot pie. Set the shredded meat aside.
  2. Cook the frozen vegetables in the microwave according to the instructions on the bag (usually 5 minutes on high). When cooked, put into a fine mesh strainer and set aside to drain. You want to remove as much of the water from the veggies as possible.
  3. In a medium/large saucepan, melt the butter over medium heat. Add the flour and spices (poultry seasoning or thyme), and whisk together (sound familiar? it's roux-makin' time) for 2-3 minutes, or until the mixture darkens to a light golden color. Add half the broth, and continue to whisk (it thickens quickly at first). Continue adding broth while whisking. If the mixture is too "tight," add a little more broth. You're trying to achieve a stiff gravy texture: this will be the sauce for the pot pie. Check the seasoning and add salt & pepper if needed.
  4. In a separate bowl, add the veggies, the meat, and just enough sauce to cover. Stir to combine. I do this because sometimes there's waaay too much sauce for the other ingredients. If you just add meat and veg into a lake of sauce, your pot pie will be weird.
  5. Add the mix to a casserole dish. Top with a pie crust (you can paint the crust with an egg wash for the most beautiful presentation, or leave it out - it won't affect the taste). Cut some slits in that crust. Bake in your 400 degree oven for ~30 minutes, or until the crust turns brown.
  6. Remove and eat.

FAQs
  • Egg wash sounds intriguing - how do I do that? >> Mix-up one egg in a bowl and "paint" it on the crust. This ain't rocket surgery...
  • How come ~70% of your recipes involve making a roux? >> Good question.
  • What is "poultry seasoning?" >> It's a spice mixture at the store, which contains: sage, thyme, celery salt, and savory. Apparently, it's good for poultry - who knew?

Pie Crust

Some people freak-out when it comes to pie crust making. Relax, yo, it's simple: flour + fat + water = crust.

INGREDIENTS
  • 1 cup flour
  • 1/3 cup shortening (Crisco)
  • 1/3 cup butter
  • 1/2 tsp salt
  • cold water

INSTRUCTIONS
  1. In a medium bowl, mix the flour and salt
  2. Dump-in the shortening and cut-in the butter. That means to cut the butter into thin slices, and drop into the flour

Wednesday, November 7, 2012

Recipe: Oven Fried Chicken

Hey chicken eater! Deep fried chicken is such a pain in the ass! Is there a way to make crispy delicious chicken without turning your kitchen into a greasy cesspool? There is now.

Chicken, noodle dish, and corn. It's dinner time!

INGREDIENTS
  • Chicken parts with skin and bones (may I recommend some breasts?)
  • Flour
  • Oil
  • Butter
  • Salt
INSTRUCTIONS
  1. Preheat your oven to 350 degrees
  2. Rinse your chicken parts in the sink. Be sure to pull-off any stringy parts of skin and fat - eew. Shake-off the excess moisture
  3. Fill a gallon-sized zip top bag with ~1 cup of flour and ~1 tsp salt
  4. Put your damp chicken parts in the bag with the flour, close the top of the bag* and shake (this will cover your chicken with flour - like, no duh)
  5. Meanwhile, heat a large skillet to medium high, add ~1 Tbs of butter and ~1 Tbs of oil, and allow butter to melt
  6. Remove the chicken from the bag and place, meaty side down, in the skillet
  7. Cook until golden* (about 5 minutes depending on the heat of the pan)
  1. Flip and cook the other side for a few more minutes until golden
  2. Evacuate the chicken to a half-sheet pan fitted with a rack
  1. Bake the chicken in the oven for 60 minutes.
  2. Remove from oven and put in your mouth - it's ok, you've earned it.
  3. Smile - chicken tastes good.
FAQs
  • How should I close this zip top bag, zip it? >> Heavens no, that's too hard. Twist the top of the bag into a makeshift closure and shake. You're not trying to seal this against the elements, you're just trying to keep flour from flying all over your kitchen.
  • Is this a messy preparation of chicken? >> Well, it can be. A friend of the blog pointed-out that, even through we're not deep frying that bird, you're still likely to have an oily mess all-over your stove. To minimize this, I recommend (and use) a screen to contain the mess. The screen is like a lid made of mesh - it allows the steam to escape, but catches the oily spatters and mess. When complete, just throw it in the dishwasher or have your kitchen staff take care of it. You bring problems; I bring solutions.
Protect your precious kitchen with this $5 piece of wire and mesh

Thursday, October 18, 2012

Recipe: Broccoli Cheddar Soup

Is soup "badass?" It is when I do it!

Just like at Panera, but without the egregious price tag

INGREDIENTS
  • 1 onion, chopped fine
  • 5 Tbs butter
  • 1/3 cup flour
  • 2 cups half & half
  • 3+ cups chicken broth/stock
  • 1 lb fresh broccoli
  • 2 carrots, grated (~1 cup finished)
  • 8 oz sharp cheddar cheese, grated
  • Salt & pepper

INSTRUCTIONS
  1. Prep the veggies
    • Cut the broccoli florets into bite-sized pieces. Cut the stem into small pieces (no sense wasting all that broccoli - use the damn stem like your impoverished ancestors). Set broccoli aside.
    • Grate the carrots. You're looking for ~1 cup of finished grated carrot. Set aside
    • Mince the onion. The goal is small onion pieces that will disappear into a soup - not big-ass onion chunks that can be seen from space
  2. Cook the onion in 1 Tbs of butter. Sweat those onions; cook over medium heat for ~10 minutes until tender
  3. Add remaining 4 Tbs butter and allow to melt. Add flour and mix together with butter and onion. Stir the flour into the butter and make a roux. Stir flour, butter, and onion for ~3 minutes.
  4. Add 3 cups chicken broth and 2 cups half & half and stir. The mixture will thicken as the liquids heat. Stir until the mixture is heated through. If it feels a little too thick add more half & half or chicken broth or both.
  5. Add broccoli to the pot and simmer for ~15-20 minutes - this will cook the broccoli. Check the doneness of the broccoli. When tender, add the carrots. Cook for 30 seconds.
  6. Buzz/blend
    • If you have a hand-held stick blender, buzz your soup into silky submission. Actually, leave a few chunks in there for rustic appeal, but process most of the soup.
    • If you have a blender, carefully pour your soup into the blender (should be done in batches to prevent painting the kitchen with hot soup) and blend a little. Like the stick blender method, leave some chunks for rustic authenticity. Return soup to the pot.
  7. Add cheese, stir, and cook for 5 minutes. Check salt & pepper - add necessary seasonings
  8. Done

FAQs
  • It seems there are a lot of soups on this site, what gives? >> Mmm, soup is easy to eat.

Monday, April 30, 2012

Recipe: Badass Beef Sandwich


This started as a neat idea and ended as a religious experience*. Try this beef sandwich, and your world view probably will be altered.
* Offer does not apply to Hindus and vegetarians.

See the layers: the Gorgonzola top, the beefy middle, the oniony bottom, and the crispy/buttery roll. I think I'm going to cry... again. Notice the salad (added for health reasons)


INGREDIENTS
  • Heat 'n eat sliced beef (like, 2+ lbs?)*
  • 4 oz. Gorgonzola cheese
  • 1/2 Cup Sour Cream
  • 4 Medium Onions, cut into 1/4" half-rings
  • Salt & pepper
  • 1 Tablespoon Red Wine Vinegar
  • Chicken Stock
  • 1.5 teaspoons Sugar
  • Italian Sandwich rolls
  • Butter

INSTRUCTIONS
Onions 
Cooked onions will eventually become this color.
This means they are sweet and delicious.
  1. Cut the onions in half (pole to pole) and then slice into 1/4" half-rings
  2. In a medium saucepan, over medium heat, cook the onions in ~3 Tablespoons butter and 1 teaspoon salt until beginning to brown (~10 minutes)
  3. Deglaze the pan with ~1/2 cup chicken stock. This will get the browned pieces of onion off the bottom of the saucepan AND chicken stock tastes good.
  4. Continue to cook the onions until they get browner and more delicious (~20 more minutes)
  5. Add ~1 Tablespoon vinegar and 1.5 teaspoons of sugar and stir to combine - cook for another 5-10 minutes.
  6. Done. evacuate the onions from the pot (try a bowl, genius) and save for sandwich construction. Be sure to taste those onions - delicious, no?
Gorgonzola Spread

  1. Pour the blue cheese into a bowl
  2. Top with sour cream
  3. Mash and stir: the goal is to make the cheese and sour cream into one glorious paste of deliciousness
  4. Done. Save the spread until later.
Rolls
  1. Cut the rolls in-half the long way (think hero sandwich, yo)
  2. Spread the rolls with butter
  3. Put the rolls, butter-side-down, on a hot griddle and cook. The goal is to add some buttery crunch to that bread. You may need to press-down on the rolls to get them to brown (see the mason jar in the pic)
  4. Done, prepare to make sandwiches
Meat
  1. You bought heat 'n eat meat for a reason: ease of preparation.
  2. Heat yo meat, follow the instructions on the package. Usually it means heat until hot, but don't boil. Why no boil? Boiling will toughen your tender meat.
  3. When done, turn-off the stove and get ready for admission to beefy heaven.
Assembly
  1. Open your buttery Italian roll
  2. On the bottom, spread some onion jam - OMIGOD, it's already awesome!
  3. Top with meat - add some juice, I will allow it
  4. Spread Gorgonzola spread on the other roll
  5. Top your meat with the cheesy roll
  6. Eat. Be sure to sit down - it's that good.
  7. You're welcome.
Sandwich assembly station
Efficiency is badass!

FAQs
  • Why not homemade Italian beef? >> That's a whole other recipe. Instead, I rely on my excellently sourced food purveyors here in the greater Chicagoland area. We have the finest foodstuffs the world has to offer, and they're all at my fingertips.
Vienna Beef. Excellent. Get some.
  • No hot peppers? >> I made this last night and added hot giardinera. It was good, but a little too much for this sandwich. For a spicy beef sandwich, just do the beef, hot giardinera, and Provolone cheese. Baptize that sandwich in the au jus - a delicious Italian beef.

Badass Music to Cook By

Hey, fat kid, do yourself a favor: next time you're cooking, blast the stereo to something that will piss-off the neighbors:

Clutch

It's badass. Need a hint? Check-out Red Horse Rainbow

Tuesday, April 3, 2012

Recipe: Shrimp 'n Grits


Famous lowcountry fare, but I’m from Chicago – what up?

Shrimp 'n grits - green beans optional

INGREDIENTS
  • 1 1/2 Cups grits (I like ‘em yellow)
  • 2 Cups heavy cream
  • 2+ Cups chicken stock/broth
  • 1 tsp Old Bay seasoning
  • 8 oz cheese*, shredded
  • 1 lb raw shrimp (31-40), peeled and deveined (31-40 means there are 31-40 shrimp per pound - your fishmonger knows all about this...)
  • 1/3 Cup green onions, sliced on the bias (that means diagonally)
  • 1/4 Cup red bell pepper, brunoised*
  • 1 15 oz. can Diced tomato
  • 1 stick (4 oz.) butter, cut-up into pieces
  • Hot sauce
  • Salt & pepper
INSTRUCTIONS
Grits
  1. In a large stockpot, pour-in the chicken stock/broth and Old Bay seasoning and bring to a simmer. Add grits and heavy cream and whisk to combine. Cook until the liquid is absorbed and the grits have lost their graininess. If you use fine textured cornmeal, this will take a few seconds and you’ll be like, “WTF!?” If these are slow cooking grits, this will take 15-20 minutes.
  2. When grits are complete, drop the heat, add the cheese, and stir to combine. Set aside.
Shrimp
  1. In a nonstick sauté pan over medium high heat, add 2 tsp canola oil. Add the shrimp in one layer and cook for ~4 minutes, or until pink. Flip the shrimp, add the tomatoes, peppers, and green onions and cook for ~3 more minutes.
  2. Turn-off the heat, add the butter and allow to melt. Add hot sauce to taste (oooo-e! that’s some spicy!). Stir to combine as one glorious topping.
  3. Serve it up! Enjoy with some sweet tea, moonshine, or other southern drink.
HOW TO EAT
  • Plop-down some grits on a plate and top with a generous spoonful of the shrimp. Be sure to get a lot of that buttery liquid: oh, that’s the stuff!
RECIPE NOTES
  • Cheese? Why is there an asterisk next to the cheese? >> There are a lot of cheeses that will fit the bill here: sharp cheddar, mild cheddar, Havarti, etc. When I last made this, I use Havarti, and it was excellent. Any kind of cheesiness will be good – go with what you like.
  • Seriously, brunoised? WTF? >> That’s a fancy French word for diced small and uniform. The red pepper dice needs to be small to ensure that the pieces cook quickly and look pretty. Pretty food is badass? Sure.
  • A note on peeling and deveining shrimp >> Being from Chicago, there are no indigenous shrimp in my history – I had to learn like any of you people. It’s simple, really: 1. peel the shrimp (just rip-off the peel and tail – there’s no trick here), 2. with a sharp (and I mean SHARP) knife, insert gingerly into the concave portion of the shrimp (it’s belly, as it were) and cut the entire length, 3. While rinsing under cold water, free the vein and rinse it down the drain, and then 4. Drop your cleaned shrimp into a bowl of cold water. See? Easy.

Saturday, February 18, 2012

Recipe: Badass Steak!

I can't believe it's taken this long, but we finally have STEAK!


Now, there are a lot of ways to make a steak, and most of them are correct (meaning that you really have to fuck things up royal to make a steak taste bad), but I have the BEST WAY TO COOK A GODDAMN STEAK RIGHT HERE!

INGREDIENTS
  • Steak(s)
  • Salt
  • Pepper
  • Canola oil
INSTRUCTIONS
  1. Pre-heat your oven to 500 degrees (that's right, 500 motherfucking degrees!), which will take 15-30 minutes
  1. Remove the steak(s) from the fridge, liberally salt & pepper, and rub with oil. Allow to rest until I tell you otherwise.


  1. When the oven has reached 500, and been there for 5-10 minutes, throw your cast iron skillet into the oven for 5 minutes - you want to get that thing red-fucking-hot!
  2. After 5 minutes, crank a burner to high heat, remove the skillet from the oven (use a mitt or gloves) and put it on the burner, then place the steak(s) into the skillet - witness the sizzle, which is good!
  1. DON'T FUCKING TOUCH, for 3 minutes.
  2. Flip and cook the other side(s) for 3 more minutes
  1. Put in the 500 degree oven for 3 minutes
  2. Open the oven, flip the steak(s), and cook for another 3 minutes
  1. Remove, evacuate to a strategically placed cutting board, tent with foil, and rest for 3 minutes
  1. Cut on the bias and serve to your special lady friend
Serving Suggestion
  • Serve with badass mashed potatoes and a vegetable (we used frozen corn tonight)

FAQs
  • Why a cast-iron skillet? >> Because you can heat that thing on the sun and not have to worry about warping or melting Teflon or any of that bullshit. Plus cowboys used to cook on it, so it's totally badass!
  • Seems too easy - what about Bearnaise, Au Poivre, or other fancier finishes? >> Fuck off, this is badass.

Purchase: Food Processor

Hello Friends,

I just placed an order for this bad ass food processor:


Cuisinart DFP-14 14-Cup Food Processor. Look-out, tiny pieces of shredded vegetables will soon be flying out of my kitchen (delivery by 2/24 according to Amazon)

Friday, February 10, 2012

Recipe: Lasagna

Damn, this is some good-ass lasagna.  All that’s missing is the trip to little Italy and the unwelcome groping of your wife/girlfriend.

Lasagna on the plate - it's beautiful

INGREDIENTS
Sauce
  • 1 Tbs olive oil
  • 1 medium onion, finely diced
  • 4 oz mushrooms, sliced
  • 6 medium garlic cloves, minced
  • 1/2 lb ground beef (80% lean)
  • 1/2 lb mild Italian sausage
  • 1/2 tsp salt
  • 1/2 tsp black pepper
  • 1/2 Cup heavy cream
  • 1 can (28 oz) diced tomatoes
  • 1 can (28 oz) crushed tomatoes
Other ingredients
  • 15 oz tub ricotta cheese
  • 1 1/4 Cup Parmesan cheese, grated
  • 1/2 Cup fresh basil, chopped
  • 1 egg, beaten
  • 1/2 tsp salt
  • 1/2 tsp black pepper
  • 12 no-boil lasagna noodles << IMPORTANT! Use the no-boil noodles
  • 16 oz mozzarella cheese, shredded
  • 1/2 Cup heavy cream

INSTRUCTIONS
Sauce 
  1. In a large Dutch oven, heat the olive oil until shimmering (2 mins).  Add onion and mushroom and saute until onion is softened (4 mins).  Add garlic and cook until fragrant (30 seconds).
  2. Add meats and cook until no pink remains (4 mins), BUT NO FURTHER!  I’ll explain later.  Be sure to break-apart the meat into tiny pieces – this will help the texture later.
  3. Add 1/2 Cup cream and simmer for 5 minutes.  This will remove some of the liquid, and leave the fat and the flavor.
  4. Add canned tomato products, salt, and pepper and simmer for 10 minutes.
  5. Kill the heat, the sauce is complete.  You can now safely refrigerate the sauce for later (it’ll keep for up to 2 days without getting nasty).  Be sure to re-heat the sauce before using again.
Assembly
  1. Mix ricotta cheese, 1 cup of Parmesan cheese, egg, 1/2 Cup cream, basil, salt, and pepper until well-combined.
  2. Ladle ~1/4 cup of the sauce on the bottom of a 9x13” baking dish.  Lay-down three lasagna noodles.  Top with 3 Tbs of ricotta mixture per noodle (9 Tbs total per layer).  Spread-out the cheese to evenly cover the noodles.  Top with 1 1/2 cups of sauce.  Sprinkle-on 1 Cup of the mozzarella cheese.  Lay-down three more noodles, 9 more Tbs ricotta, 1 1/2 cups more sauce, and 1 cup of mozzarella.  Do it again – that’s three layers.  For the final layer... 
  3. Top the final layer with the last three lasagna noodles.  Top with the remaining sauce, and sprinkle-on the remaining mozzarella cheese.  Sprinkle-on the remaining 1/4 cup of parmesan cheese (you know, the cheese you DIDN’T use for the ricotta mixture).
  4. Preheat your oven to 375 degrees.
  5. Cover with foil that has been sprayed with non-stick cooking spray (to prevent the cheese coming-up with the tin foil), and bake for 15 minutes.  Remove the foil and bake for another 25 minutes, or until the cheese is slightly browned.
  6. Let cool for a minute or two, and cut and eat.  This will easily make 12 good-sized chunks (for the ladies), or 6 monster-sized chunks (for the gentlemen).  It took 1.5 pans of lasagna to feed eight large adults and four small children, but we were all stuffed royally afterwards.

RECIPE NOTES
  • Beef and Italian sausage? >> Yeah.  Lots of Italian recipes call for “meatloaf mix” when they’re specifying ground meats.  Meatloaf mix is 1/3 ground beef, 1/3 ground pork, and 1/3 ground veal.  To me, that’s a major pain in the ass.  You can sub-in the Italian sausage (ground pork) and get some extra flavors as well.  Be sure to buy loose sausage from the butcher, or cut the sausage out of the link casings – don’t just throw-in some Italian sausage links and think it’s going to work.
  • What’s with the heavy cream? >> The classic Bolognese sauce uses milk/cream, and they really knew their business.  It almost acts as a panade and keeps the meat moist and delicious. In the ricotta cheese, the cream keeps things moving - otherwise the cheese tends to be a little sticky.
  • Cook until no pink remains and no further, WTF? >> Many times you want to “brown” the meat, which makes a flavorful crust.  If this was a long-cooking stew, I’d say go for it, but it’s not – this is a quick-cooking lasagna.  We want to make sure the meats are cooked, but still want them to be tender.  It’s all part of the master plan.
  • What's with the no-boil noodles? That's not how grandma makes it >> There are two reasons: first, no-boil noodles are easier. Second, they are more consistent. If you've ever tried to make lasagna from regular noodles, you burn your hands on the hot pasta, rip a few, and then end-up with not enough to make a perfect dish. The no-boil work right every time. Do as I say.
  • There aren’t a lot of spices, is this right? >> That’s what I thought too, but it works.  Turns-out you don’t need a lot of spices for this lasagna – it’s awesomely fantastic without them.  Also, the Italian sausage adds the right amount of backbone so you don’t need extra. Also, asking questions is not bad ass.
Here's how it looks out of the oven. A work of art, no?

Monday, February 6, 2012

Tip: Fix Yo' Stanky Kitchen Sink!

Here's a tip for you...

Lemony goodness awaits
When your in-sink garbage disposal starts to reek, throw a lemon down in there and grind it up. The essential oils in the lemon will clean the filth, and will swap a foul funk for an aromatic alternative.

AND, the next time you're juicing lemons, don't throw-away those used-up lemon corpses! Chop into eighths, put them into a freezer bag, and throw it in the freezer. There it will remain in suspended animation until your sink starts to stink. Toss a few frozen lemon pieces into the sink and spin to win.

You're welcome.

Sunday, January 8, 2012

Recipe: The Shepherd's Other Pie

Shepherd’s Pie is usually made with lamb (you know, a shepherd = sheep). But this is another pie the shepherd might make, this time with chicken. The shepherd doesn't really have much imagination: everything is a casserole topped with mashed potatoes. Let’s begin!

Chicken and mashed potatoes - a match made in heaven? Yes

INGREDIENTS
  • 4-5 lb Whole Chicken, thawed
  • 4-5 Medium Carrots, sliced thin
  • 2 Ribs Celery, medium dice 
  • 1 Medium Onion, medium dice
  • 1 16 oz Bag of Frozen Peas
  • ½ Cup Flour
  • 3 Cups Chicken Broth/Stock
  • 6 Tbs Butter
  • 6-7 Medium Potatoes
  • 1 Cup Half & Half
  • Salt & Pepper
  • Poultry Seasoning

INSTRUCTIONS
Chicken
  1. Remove the innards from the chicken (they are usually placed in a convenient bag) and discard. We will not need any chicken guts this evening, but feel free to save them for your special organ meat luncheon that is coming-up.
  2. Rinse the chicken well, inside and out. Dry the outside of the chicken with paper towels, and place in a roasting pan large enough to hold the chicken and the juices that are bound to escape
  3. Coat the outside with a small amount of vegetable oil (rub it into the meat with your hands) and sprinkle a generous amount of salt inside and outside the bird. The salt with give it flavor, and is very important.
  4. Roast in a 350 degree oven for ~90 minutes. Remove from oven, let sit for ~15 minutes, and then separate the meat from the carcass – you only need the meat. Cut the meat into large bite-sized pieces (or shred) and set aside.
Potatoes (we've been here before)
  1. Peel and quarter the potatoes. Place into a large pot. Add enough water to barely reach the top of the potatoes. Sprinkle-on 1 Tbs of kosher salt, cover, and set on medium high heat.
  2. When the pot comes to a boil, drop the heat to low and simmer for ~20 minutes, or until the potatoes are tender.
  3. Drain the water, and rice or mash your potatoes to completion. Add the Half & Half and stir together. You will notice that the mashed potatoes are silky and delicious – oh, that’s good!
  4. Set the potatoes aside 
Stew
  1. In a large saucepan, melt 2 Tbs of butter over medium heat.  Add the carrots, onion, and celery and cook until tender, about 10 minutes. Be sure to “sweat” the veggies and not brown the veggie. The goal is to cook them to release their flavors, not to add new caramelized flavors. About half-way through the sweating, add ~2 tsp of Poultry Seasoning (or 1 tsp of Thyme) and 1 tsp salt and ½ tsp black pepper. This will give the seasoning a chance to soften (especially Thyme: it’s particularly woody, and can be a little spiky in the dish)
  2. Add 2 Tbs of butter and the flour. It’s like a roux (again), and this with thicken the sauce. Cook the flour in the butter and veggies for a few minutes – enough time to allow the flour to cook. Add the broth (1 cup at a time) and stir. Allow the mixture to thicken before adding the next amount. When all the broth has been added, add the frozen peas and allow them to cook in the broth (5 minutes). Add the chicken you have already set aside and bring everything up to proper temperature.
Pie
  1. Dump the stew in a decorative casserole dish. Be sure it’s deep enough to contain the stew here.
  2. Top with the mashed potatoes – be sure to smooth-out the potatoes to cover the entire dish.
  3. Now, you can take a fork and gently carve designs into the potatoes. Melt the remaining 2 Tbs of butter and pour over the potatoes – it will be delicious and also help the potatoes brown in the oven.
  4. Bake at 400 degrees for 20-25 minutes, or until the potatoes begin to brown. Remove and eat.

RECIPE NOTES
  • This seems tough, is it really worth it? >> Yeah, it is – this was awesome!
  • Whole chicken – can I substitute parts? >> Yes, that’s fine. The whole chicken was the right amount of meat. So, I’d go with 2 breasts and 2 thighs or 3 breasts if you want an all-white-meat version.

Tuesday, January 3, 2012

Recipe: Potato & Leek Soup

It's wintertime, and that means it's time for soup. After I made this, my wife exclaimed, "Mama Mia, that's a spicy meatball!" wait, wrong wife. She actually said it was the best soup I have ever made. Sounds like high praise, right? Well, I have made a number of soups in the past, and my ego of experience took a huge hit (were the soups from the past just bowls of poorly made piss?) No matter. I choose to accept this praise at face value: she enjoyed the soup. I'm guessing that you will enjoy it too. Enjoy it, that is, unless you fuck it up. Keep reading to see how to make it right.

Potato & Leek soup in a bowl on my table. 
What's that? Homemade bread too? Yes, I am awesome

INGREDIENTS
  • 3-4 leeks, washed and cut into rings
  • 1 onion, diced
  • 3 potatoes, peeled and diced
  • 4 cups vegetable broth
  • 4 Tbs butter
  • 1 cup half & half
  • Salt & pepper
INSTRUCTIONS
  1. Prep the veggies: dice the potato, dice the onion, and wash & cut the leeks (see the note on leeks below - they deserve special attention)
  2. In a large pot, melt the butter over medium heat. Add the veggies and cook until tender but not browned - about 10 minutes. Stir the veggies from time to time to prevent browning. Add the stock and bring to a boil (if the stock is not enough, feel free to add a little water - enough to barely cover the vegetables). Reduce the heat, cover, and simmer for ~20 minutes until the vegetables are cooked-through.
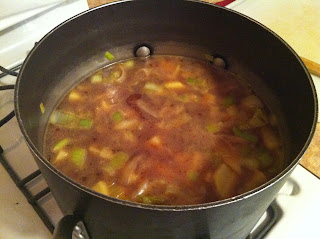
Leeks, onions, and potatoes in the pot with vegetable stock. Note how the veg stock slightly exceeds the level of the materials - this is the right amount (you can even go with a little less stock). Why is the veg stock red? It's the tomatoes - veg stock has some tomatoes in it
  1. Now it's time to process: using your trusty stick blender, buzz the shit out of the mixture until it's smooth and creamy. no stick blender? Put the mixture into a blender or a food processor and spin to win. Watch out! Hot soup is like napalm in a blender - don't get any on you!
Stick blender in the pot grinding-up soup. It's the way to go
  1. Add the half & half and stir. Taste it. Needs salt, right? Add salt & pepper to taste.
Add the half & half, buzz, and then add the salt
  1. Done. Ladle-up some, and eat healthy soup with your family.
RECIPE NOTES
Use all the white, all the light green, and ~1" of the dark green
  • What do I do with these friggin' leeks? >> They are certainly weird. And unless you're a bonafide soup maker, you're unlikely to have any experience with leeks. A leek is like a large green onion - a tender white bottom and a dark green top/stalk. The dark green tops are tough - let's get rid of most of them. Cut-off the bottom root (trim closely, we want to preserve the white section) and the top - leaving only ~1" of dark green. Now, cut the whole stalk in-half lengthwise. Look closely, you will notice that the leek is made of many layers (like an onion). Leeks are grown in especially loose and sandy soil, so there's likely to be dirt and grit in between layers. Slice the leeks into 1/2" rings then drop those leeks into some clean water and clean 'em off. Rinse and repeat. Advanced move: spin in a salad spinner to remove the water - yeah, that's the stuff
  • How do I store this soup? >> I don't recommend long-term storage, but this will make ~3/5 gallons of soup - possibly more than you want to eat all at once. I recommend using mason jars for storage. You can use the small pint-sized ones to make a soup serving ready to bring to work. Or you can dump it into a half-gallon jar and store it in the fridge (pictured)
Jar full of soup. Keep it next to the orange juice and above the shelf of beer

UPDATE - July 2, 2012
I made this soup last night and decided that I wanted a greener and more healthful looking soup. Let's face it; made properly, the potato leek soup is not as green as you'd expect. The soup takes-on more color from the potato than the leek (we're using the tender white bottom after all...) How to make it green...?

SPINACH!

For greener soup, cook the soup as directed above. For the last 3-5 minutes, drop-in a cup of baby spinach and let it cook with the soup. Those leaves cook quick, and won't add much flavor, but oh baby, they add color and health to the soup. Grind it up as before, and you'll have a beautiful green soup ready for consumption. You're welcome

Here it is with the spinach buzzed-in. Notice the greener hue and green flecks. 
That's health staring you in the face. Popeye would be proud.