Thursday, December 31, 2009

Review: Ravenswood Zinfandel

Me and the wife cashed-in a $100 Lettuce-Entertain-You gift card at Maggiano's the other night in exhausting Schaumburg, IL. I knew we weren't up for a bottle, so settled on two glasses of wine. Lo and behold, I saw a wine that I have enjoyed at home in the past:

Ravenswood Zinfandel

It's a good one! A little steep, perhaps, at $8+ per glass, but compared to the other by the glass wines on the menu, a bargain. It was bold (like a Cabernet), but not too dry. It was perfect for the I-talian food we ordered.

You can certainly pick-up an affordable bottle of Ravenswood Zinfandel at your local liquor store for $15 or less (always look for sales).

Wednesday, December 30, 2009

Recipe: Sugar Cookies

You like to decorate cookies for Christmas? Use these ones, and Santa won’t skip your plate of cookies this year.

Want to waste all your free time decorating cookies?
Then this is the recipe for you.

INGREDIENTS
  • 3 Cups A/P Flour
  • 3/4 tsp Baking Powder
  • 1/4 tsp Salt
  • 2 Sticks (16 Tbs) Unsalted Butter, softened
  • 1 Cup Sugar
  • 1 Egg, beaten
  • 1 Tbs Half & Half
  • 1 tsp Vanilla Extract
  • Powdered Sugar for rolling out dough

INSTRUCTIONS
  1. In a small bowl, stir together flour, baking powder, and salt.
  2. With an electric mixer, beat butter and sugar together until the butter lightens in color and is frothy. Add egg, half & half, and vanilla and mix to combine. With mixer on low, slowly add flour mixture until homogeneous.
  3. Knead dough lightly with hands to ensure it is evenly mixed. Divide into two pieces, wrap each half with plastic, and refrigerate for at least 2 hours (overnight is better).
  4. Preheat oven to 375 degrees.
  5. Sprinkle powdered sugar on a clean counter top and rolling pin. Roll-out one piece of dough to 1/4" thickness (NO THINNER, DAMMIT!) Cut with your cutest Christmas shapes (or Happy Hanukkah shapes for the Jews). Gingerly move the cut shape to a heavy baking sheet lined with parchment paper for baking. Leave 1” or more space between cookies.
  6. When you've cut-out all the shapes that will fit, you can re-roll the scraps. Just gently form the scraps into a ball, flatten the ball, and then roll-out into another 1/4" disk. Use the second dough half when the first is completed – leave as much dough in the fridge for as long as possible. IT’S IMPORTANT TO KEEP THIS DOUGH COLD TO ENSURE ARTFUL AND SHARPLY CUT COOKIE EDGES – like, no duh!
  7. Bake for 7 to 9 minutes rotating the cookies halfway-through the baking process.
  8. Cool for 2 minutes on the cookie sheet and then evacuate to a cooling rack until cooled. You can store the cookies in a plastic storage bag until you want to decorate them or until you want to eat them – either way.


FAQs
  • Unsalted Butter? >> Most baking recipes include salt and specify unsalted butter. This is because there are small differences in the amount of salt in yo butter. If I don’t have unsalted butter in the house, I generally assume ~1/4 tsp of salt is in each stick of butter. The actual salt is probably a little less than that, but you have to start somewhere.
  • Electric Mixer >> You can certainly use that underpowered hand mixer for these cookies, but I wholeheartedly recommend breaking-out the big-ass stand mixer. It mixes all by itself, and leaves you two hands free for Christmas beer consumption.
  • Parchment Paper >> So many people get all weirded-out by lining a baking pan with parchment paper. Trust me people, the paper isn’t going to burst into flames in your weak-fisted oven. I never bake anything without parchment paper. You can use a silicone mat (Silpat) is you have one, but remember: parchment paper is ~10 cents; silicone baking mat is ~$30.
  • Icing >> The standard way to ice these cookies is with “Royal Icing.” It involves mixing egg whites, cream of tartar, and powdered sugar. This year I used white cake frosting (from a can) and the kids liked it. Be sure to load-up on sprinkles and colored sugar and all that bullshit – it’ll be a warm family moment.

Tuesday, December 29, 2009

Recipe: Smashed Potatoes

WTF are smashed potatoes? Well, these potatoes are made with waxy potatoes (red or Yukon Gold) and mixed with cream cheese and herbs. You can still ladle-on the gravy, fat ass, so stop your freakin'! For traditional mashed potatoes, check-out my earlier recipe.

This was one of the sides for my oh-so-successful 2009 Christmas dinner. I'll feature Christmas recipes over the next few weeks because I've got nothin' else.

These are chunkier than I usually make: still delicious


Smashed Potatoes
will serve up to 10 adults

INGREDIENTS
  • 5 lbs red potatoes (can substitute Yukon Gold, but I like the red)
  • 1 lb cream cheese (that's 2 "bricks") cut into 1" chunks and brought to room temperature
  • 1/2 cup half & half brought to room temperature
  • Chives
  • Salt & pepper


INSTRUCTIONS
  1. Peel half the potatoes. Cut all potatoes into golf ball sized pieces and place into large pot. Sprinkle with ~2 Tbs kosher salt and fill with water until the water reaches just below the top potato - no use water-logging those spuds!
  2. Cover and bring to a boil over high heat, then reduce to low and simmer for ~20 minutes, or until the potatoes are softened (check softness by inserting a paring knife - if it goes in easily, the potatoes are done)
  3. Drain the potatoes and return to the pot. Using a potato masher, mash the shit out of those potatoes. Leave them the consistency you like. Me personally, I like them more creamy than chunky, so I really go to town.
  4. Add the cream cheese and stir. You'll notice the cream cheese is melting into the potatoes - that's good. Keep the half & half in reserve - add it if you need to loosen the texture. Chances are you'll need a little, but might not need all of it.
  5. Check salt & pepper. The potatoes should have enough salt (from the cooking), but could need some pepper if you so desire.
  6. Using scissors, snip the chives into 1/2" pieces and stir into the potatoes. Done. Serve and eat.


FAQs
  • Room temperature - is that necessary? >> Yeah, it is. Cold dairy will cool-down your potatoes to an unacceptable serving temperature. You'll be embarrassed and humiliated and unable to look decent society in the face for a long time to come. Poor poor bastard!
  • How can I easily drain those potatoes? >> The way I do it, and the way you should too, is to skew the lid leaving ~1" of space for water to drain. Then, I use two pot holders to hold-down the lid and drain the water into the sink. The potatoes stay in the pot, but the water is drained. It's genius, for sure.
  • Chives? WTF are chives? >> Chives are like little green onions (scallions). They're shaped like long blades of grass and are impossible to cut with all but the sharpest of knives (you don't have one sharp enough - trust me). The best way to cut them is with a scissors - it's easy.

Friday, December 4, 2009

Recipe: Chicken Noodle Soup

Not that you can’t find heat-and-eat soup in a can; but don’t you want something that’s homemade, has less salt, and only costs pennies per serving? Let me answer for you: YES, YOU DO!

Here’s a recipe for chicken noodle soup that’s as easy as it gets and is mmm mmm God Damn delicious!

I use different noodles, but this shows how delicious it can be...

INGREDIENTS
  • Two bone-in chicken breasts
  • 96 oz. of chicken broth (aseptic container or home-made preferred)
  • 4 carrots (cut into “coins”)
  • 4-5 celery ribs (chopped)
  • 12 oz. Egg noodles – specifically “Kluski” noodles (they look like the noodles in the Campbell’s Chicken Noodle Soup can)
  • Water
  • Salt & pepper
INSTRUCTIONS
  1. Pre-heat the oven to 400 degrees. Rinse the chicken breasts with warm water, clean-off the extra fat and nonsense, and pat-dry with a paper towel. Place the chicken into a glass baking dish and roast in the oven for ~25 minutes or until cooked (may take longer depending on the shape of the breasts – check the temp with an instant read thermometer – 180 degrees for white meat chicken – or, cut-into the breast at 25 minutes. If it’s all “white,” then you’re good to go, otherwise cook for additional five minute intervals until done).
  2. While the chicken is roasting, you can prep the veggies. Clean the celery and peel the carrots. Slice the vegetables into thin slices – remember: you’re going to have to fit this on a spoon.
  3. Pour the chicken broth into a large stockpot (your largest) and set the flame to medium. Dump-in the vegetables. Bring the broth to a simmer – it’s not necessary to boil. In fact, try to hit 200 degrees (if possible) without ever getting to 212 (that’s the boiling point at sea level). The reason is that “boiling” is pretty destructive, and you’re trying to keep some delicate flavors alive.
  4. Once the pot’s reached its target temperature, add the noodles and simmer for ~10 minutes or until the noodles are cooked.
  5. At this point, the chicken should be done. Peel-off the skin and remove the meat from the bones. Cut that breast into small soup-sized pieces and add to the pot. If there are any “drippings” in the baking dish, toss those in as well – no use wastin’ all that good flavor!
  6. Check the soup flavor – chances are, it needs salt – go ahead and add some. If the mix is a bit too strong, add some water – add as much as you like. That’s it – no brain surgery.


FAQs
  • Aseptic container? >> That’s the “carton” of chicken broth you see at the store. It has a better flavor than the cans, which I find “tinny” for this recipe. The large boxes generally come-in 32 or 48 oz. sizes, so use two or three for this recipe. If you want to make home-made chicken stock, then more power to you. It’s something I haven’t made yet, and don’t really have the storage space to contain...
  • Checking doneness of chicken >> If, for some reason, your chicken escapes the oven before it’s “completely” done, relax: it’s going to spend a little time in a pot of near-boiling broth/water; it won’t infect you with salmonella. But, you really are going to have to learn how to check a chicken’s doneness and the time/temp guidelines for meats – I mean, I’m not going to live as your culinary judo master forever, you know!
  • 200 degrees? Are you serious? >> Yes. Like I said, you don’t want to vigorously boil the mixture, so try to keep it just under the boil. That’s called a “bare simmer” and it means that bubbles are just barely breaking the surface of the pot. If you live in the mountains and have altitude issues with the boiling temperature of water, then you’re on your own.
  • This seems pretty bland >> Yeah, don’t go crazy and start adding a bunch of other weird shit to the pot – this is a recipe for a good honest bowl of chicken noodle soup – simple and good.

Thursday, December 3, 2009

Recipe: Brownies Two Ways

Either of these brownie recipes are the best damn brownies you’re likely to have tasted in your pitiful life. The difference is how the chocolate is being delivered: cocoa or chocolate bar. If I had to choose, I’d make both and just start wearing sweatpants!

There's no need to add weed to these brownies...

Cocoa Brownies

INGREDIENTS
  • 4 large eggs
  • 1 cup granulated sugar
  • 1 cup brown sugar
  • 8 oz. melted butter (two entire sticks!)
  • 1 1/4 cups cocoa, sifted (use “Dutched” cocoa – see note)
  • 2 tsp vanilla extract
  • 1/2 cup all-purpose flour, sifted
  • 1/2 tsp kosher salt
  • Nuts (optional)

INSTRUCTIONS
  1. Preheat the oven to 300 degrees
  2. In a mixer with a whisk attachment, beat the eggs until they are fluffy and lighter in color (high-speed for a few minutes)
  3. Swap-out the whisk for the paddle attachment, and mix-in the sugars until it is all blended-together well. This maneuver will incorporate air into the mix and fluff-up the brownie texture. If you don’t do this, you’ll end-up with leaden brownie logs.
  4. Add the remaining ingredients and mix to combine. Be sure to NOT over-mix. Mixing flour will create gluten. Gluten is what gives structure to things like bread. Over-producing gluten will make tough brownies. Just mix it until it’s fully combined, then stop.
  5. NUTS: if you like to add nuts, now is the time. Add up to a half-cup of chopped nuts to the brownies - walnuts or pecans are best.
  6. Bake the brownies in an 8x8 baking dish (preferably, a square-sided metal baking pan) fitted with a parchment paper sling (see note).
  7. Bake for 45+ minutes until a toothpick inserted in the center comes-out clean.
  8. Let the brownies cool in the pan for ~5 minutes, and then evacuate the 8x8 brick to a rack for further cooling. Use the helpful parchment paper sling. Cut and eat the brownies when they are cooled completely.

SERVING SUGGESTIONS
  • Cut into 2x2 squares, 16 pieces total. Doesn’t sound big enough? Just taste and you’ll see!

FAQs
  • Nuts >> For added flavor, toast the nuts in a non-stick skillet over medium heat until they are warmed, or toast on a sheet pan in a 300 degree oven for ~10 minutes, or until fragrant. “Toasting” the nuts will release some essential oils and make them taste better.
  • Nuts 2 >> I advocate mixing the nuts in with the batter. You can also “top” the batter with nuts before baking. Either way sounds good to me!
  • Pan Prep >> For this recipe, you will need to pay careful attention to the pan because brownies are notorious for getting stuck in the corners of pans – especially in the square-sided pan I ordered you to use for baking. To properly prepare the pan, you will need an 8x16+ piece of parchment paper
    1. Spread butter all over the pan (inside only please). The goal is to lightly coat all the metal surfaces without any build-up. Built-up butter will pool during baking, harden on the outer surface of the brownie, and be weird-looking.
    2. Lay the parchment paper in the bottom of the pan – draping the long ends outside of the pan. This will create a “sling” for removing the brownies later. Don’t worry, parchment paper won’t burn in the oven and won’t leave off-flavors like wax paper would.
    3. Butter the parchment paper too – just the bottom.
    4. Dump-in the cocoa (or flour) and tilt and shake the pan until all the butter has been dusted with cocoa. This will create a barrier between the butter and the batter. Be sure to only lightly coat the butter and then throw-away the excess.
    5. Pan is sufficiently prepared for brownie baking.

Chocolate Brownies

INGREDIENTS
  • 4 large eggs
  • 2 1/4 cups granulated sugar
  • 12 oz. butter, cut into ~6 pieces
  • 1 1/4 cups cake flour
  • 6 oz. unsweetened chocolate, chopped fine
  • 1 Tbs vanilla extract
  • 3/4 tsp baking powder
  • 1/2 tsp kosher salt
  • Nuts (optional)

INSTRUCTIONS
  1. Preheat the oven to 325 degrees
  2. Whisk together flour, salt, and baking powder – set aside.
  3. Melt chocolate and butter in large metal bowl set over saucepan of almost-simmering water (aka double boiler), stirring occasionally, until smooth. Add the butter a piece at a time until melted.
  4. Remove from the heat and whisk-in the sugar and eggs (one at a time) until combined. Mix-in the vanilla. Fold-in the flour in three batches with a rubber spatula – remember about the gluten! Don’t over-mix flour! Stir until homogenous.
  5. NUTS: if you like to add nuts, now is the time. Add up to a half-cup of chopped nuts to the brownies - walnuts or pecans are best.
  6. Bake the brownies in a 9x13 baking dish (preferably, a square-sided metal baking pan) fitted with a parchment paper sling.
  7. Bake for 30-35 minutes until a toothpick inserted in the center comes-out clean.
  8. Let the brownies cool in the pan for ~5 minutes, and then use the parchment paper sling to evacuate the 9x13 brick to a rack for further cooling (~2 hours). Cut and eat the brownies when they are cooled completely.

SERVING SUGGESTIONS
  • Cut into 2x2 squares, ~24 pieces total

FAQs
  • Nuts >> See cocoa brownie notes on nuts
  • Pan Prep >> See cocoa brownie notes on pan prep, but scale-up the sizes for the bigger pan (duh!)
  • Double boiler, WTF?!? >> A “double boiler” is a tool to cook/melt something by using the steam generated by water that is barely simmering. This is a very gentle way to melt chocolate. If you were to melt chocolate in a pot on the stove, you’d definitely burn some and then separate the rest. The results would not be pretty. If you’re really too inept to attempt the double boiler trick, you can microwave the chocolate. Do this in 15-20 second “bursts” stirring after each burst. Stop microwaving when everything looks right. But I urge you to try the double boiler – it’s crucial if you ever hope to make hollandaise!
  • Cake flour >> There are three basic types of flour based on protein content: cake, a/p, and bread. Cake flower has the lowest amount of protein and bread flour has the highest. It’s the protein in the flour that creates the gluten, and the gluten makes baked goods tough. So, for the tenderest baked goods, use cake flour. For the heartiest breads and pizza crusts, use bread flour. And, if you’re just not sure what to do, use all purpose flour.

Wednesday, December 2, 2009

Recipe: Pizza Pizza

I frequently say, “I make the best pizza in McHenry County, IL.” It’s true, and until a Lou Malnati’s restaurant opened-up shop down the street, it wasn’t that impressive an accomplishment. But even with Lou’s down the street, this is still the best. I’ll let him have the “Chicago style” deep dish pizza honors, I focus on thin crust.

This recipe is broken into three parts: dough, sauce, and construction. Try to keep-up!


Pizza Dough
Makes enough for two “large” pizzas

INGREDIENTS
  • 4 cups Bread Flour (No, it’s not ok to use A/P flour)
  • 1 1/2 cups Warm Water (water should be between 100-110 degrees)
  • 2 tsp Instant Dry Yeast
  • 8 tsp Sugar (that’s 2 2/3 Tbs)
  • 2 tsp Kosher Salt
  • 2 Tbs Olive Oil

INSTRUCTIONS
  1. In a glass 2-cup measuring cup, mix the water, sugar, and yeast. Let sit for ~5 minutes to give the yeast a chance to “wake-up.”
  2. In the bowl of your stand mixer, combine the flour and the salt.
  3. Stir the yeast mixture to get the stuff off the bottom. Add the oil to the water and dump the whole thing into the mixer.
  4. Using the dough hook, mix for 20 minutes on the lowest speed. Sometimes I've noticed that the dough is a little too sticky. If that's the case, you can add a few tablespoons of flour into the mixing bowl - that will help dry it out a little. Even though a sticky dough is a pain in the ass to work with, will make a more tender crust. 
  5. Knead dough on the counter to form a ball – about 30 seconds. Cut the dough ball in half and roll each half into its own ball – about 1 minute.
  6. Put each ball into a glass bowl that has been sprayed with non-stick spray (Pam) and cover with plastic wrap. Put into a warm place for 2+ hours.

FAQs
  • Bread Flour? >> As I’ve said before, bread, all-purpose, and cake flours have different protein amounts. It’s the protein that allows the flour to develop gluten which is what gives bread its structure. Bread flour has the highest protein level, and will make the best texture crust.
  • I have packet yeast – how much? >> I always buy “bulk” yeast, and measure-out what I need. But I think that one packet has 2 1/2 tsp, so just use one packet.
  • I ain’t got no stand mixer. >> This dough is so much easier in a stand mixer, but you can do it manually. Just knead the shit out of that dough for 20 minutes. You’ll notice that the dough starts to tighten-up quickly, but it’s the continued kneading that develops the gluten. A general rule of thumb I’ve seen is that you should manually knead twice as long as the mixer. That would be 40 minutes, which is too long. Knead for 20 and see how that goes. Then tell me all about your NEW mixer – you know, the one you decided to buy after kneading your arms into oblivion that one day!
  • Warm place for 2 hours, WTF? >> Yes, you need to “proof” the dough, which means to let it rise. I put mine in the oven (turned off) and then pour boiling water into a loaf pan and put that in the oven too. The boiling water will make the oven warm and the steam will make it humid: warm and humid is perfect for proofing dough.

Pizza Sauce
Makes enough for three “large” pizzas

INGREDIENTS
  • 1 6 oz can Tomato Paste
  • 1 8 oz can Tomato Sauce
  • 1 tsp garlic, minced or crushed
  • 1-2 tsp Dried Basil
  • 1-2 Tbs Dried Oregano
  • 1 tsp Sugar
  • 1/2 tsp Onion Powder (optional)
  • Black Pepper
  • Olive Oil

INSTRUCTIONS
  1. In a small saucepan over medium heat, add ~1 tsp olive oil and the garlic. Let cook for a minute or so – until you hear the garlic starting to sizzle.
  2. Dump-in the tomato products and the spices. Stir to combine.
  3. Bring to a near-boil.
  4. Turn-off the heat, and let sit on the stove until you’re ready to use (hopefully in a few minutes, but can sit for a long time if needed)

FAQs
  • Doesn't seem like enough sauce for three pizzas >> Relax, you’re not going to take a bath in the stuff. You don’t really use that much sauce on an individual pizza.
  • Why “teaspoons” for basil and “tablespoons” for oregano? >> The oregano flavor is the predominant flavor in pizza. That’s why it’s put on the table in pizza restaurants in a cheese shaker.
  • What’s up with the sugar? >> A lot of times, sugar is used to temper the acidity of tomatoes in cooking. This is another one of those times.
  • Hey, this is enough sauce for three pizzas, but only enough dough for two pizzas - what gives? >> I didn't invent the amount of tomato sauce/paste they put into those cans. The good news is that you can save the sauce as a perfect dip for mozzarella sticks or the uneaten pizza crusts from your kids plates (pretend they're breadsticks, and dip them in the delicious sauce)

Pizza Construction
One pizza serves one 4-person family (daddy, mommy, boy, and girl)

INGREDIENTS
  • 1/2 Pizza Dough Recipe (see above)
  • 1/3 Pizza Sauce Recipe (see above)
  • 8 oz. Mozzarella Cheese
  • Pepperoni (optional)
  • Italian Sausage (optional)
  • Red Bell Pepper, diced small (optional)
  • Mushrooms, sliced thin (optional)
  • Black Olives, sliced (optional)

INSTRUCTIONS
  1. Preheat your oven to 450 degrees.
  2. Remove your proofed dough from the bowl, and place on a floured surface. Flatten the dough into a disc (think “pizza shape”) and stretch the dough gently into the desired shape. Don’t be afraid to pick-up the dough and stretch with your fingers – using bread flour has made this into dough that can take your weak-fisted punishment.
  3. Place the dough on a perforated pizza pan (the kind that is round and has a bunch of holes)
  4. Spoon-on the sauce.
  5. Sprinkle-on a “base layer” of mozzarella. I generally use 1/3 of the cheese beneath the toppings and 2/3 above.
  6. Toppings.
  7. Top cheese.
  8. Bake in the oven for ~13 minutes. I start the pizza on the bottom of the oven, and move to the top about halfway thorough the cooking process. That way, the crust gets crispy (bottom) and the cheese gets browned (top).
  9. Cut in wedges (makes 12 wedges easy) and eat.

FAQs
  • Do you “toss” your pizza? >> Yes, I am awesome.
  • Pizza pan – why not a pizza stone? >> I have a pizza stone, but I think it’s a major pain in the ass. I don’t have a pizza peel (that’s the wooden paddle used to deposit and withdraw pizzas from the oven), so I would have to use a cookie sheet. I suppose if I had a peel, I’d have more success. Also, my stone is smaller than the pizza pan – I’d have to make smaller pizzas. That’s not something I’m interested in at this time...
  • How do you sauce? >> Ok, I start with about 2-3 Tbs of sauce (don’t bother measuring, Martha!) in the middle of the dough. Then I take the back of the spoon and start spreading it around. The goal is to cover the dough with as thin a layer of sauce as possible. If you use too much sauce, the dough will cook weird and the cheese will just slide around. Do it my way once, and then try what you like.
  • Topping suggestions >> There are two basic pizzas in my arsenal: [pepperoni and black olive] or [sausage and mushroom].
    • Sausage & Mushroom: Use ~6 oz. of mild Italian sausage per pizza and ~4 oz. raw mushrooms. I cook the sausage before putting it on the pizza – I don’t think a home oven gets hot enough to cook the sausage on the pie (restaurant pizza ovens get to 600+ degrees). Plus, a benefit to cooking the sausage before is that I can drain the sausage and eliminate all that extra grease.
    • Pepperoni & Black Olive: I lay-down the pepperoni from the outside-in with consistent spacing throughout. Some people might think it’d be great to make a “sheet” of pepperoni. To those idiots, I’d say “remember proportions.” There’s a reason you’re not eating just a brick of pepperoni – you want the flavors to work with one another. Sprinkle the black olives on top of the pepperoni.
    • Any Pizza: A welcome addition to either of these pizzas is some diced red bell pepper. It adds a nice sweetness to the pie. 1/4 of a pepper should be enough for one pizza.

Tuesday, December 1, 2009

Recipe: Guacamole

The first time I made this was for when my boss came-over for dinner with his fiancee. The guy ended-up eating way more than his fair share - what a DICK! Anyway, it's awesome guacamole - give it a try and you'll see...

Guacamole

I’ve had Mexican guacamole, and it’s no wonder there’s so much of an illegal immigration problem: they’re all trying to get some of my Chicago-style chip dip. Do yourself a favor and make this.

Get yourself a molcajete, or a gay boyfriend, and you can serve-it-up fancy like this!

INGREDIENTS
  • 4 Haas Avocados (those are the dark bumpy ones)
  • Juice from one lime (be sure to get all that juice)
  • 1/4 Red Onion, diced super-fine (and rinsed)
  • 1 Tbs Cilantro leaves, chopped
  • 4 Roma Tomatoes, diced (see note)
  • 1/2 tsp Garlic Powder
  • 1 tsp Kosher Salt
INSTRUCTIONS
  1. Scoop-out the avocado flesh and put in a large bowl. Dump lime juice over the avocados. Add the garlic powder and half the salt. Mix with a potato masher until it reaches the desired consistency.
  2. Stir-in the tomatoes, onion, and cilantro. Check seasoning – add the rest of the salt if needed.
  3. Move from the large bowl to a fancier chip dippin’ bowl. Eat.
RECIPE NOTES
  • Avocados >> Usually, from the selection of avocados at the store, you’re either making guacamole TONIGHT (OMG, THEY ARE READY THIS FUCKING SECOND!) or next weekend – meaning that they’re either pudding-soft or hard as a rock. When choosing an avocado, you ideally want one that gives “slightly” under pressure from your thumb and doesn’t feel like a rotten banana. AND, don’t pick the “fuerte” avocados: those are the bright green ones that are big. They don’t make good guacamole because they NEVER reach the right texture.
  • How do I remove the seed from the avocado? >> What I do, and it’s recommended by every chef out there, is to halve the avocado (the seed will be in one of the halves) and then, using your chefs knife, lightly “chop down” on the seed – embedding the knife into the seed, then twist the knife/seed – loosening and removing the seed. To get the seed off the knife, I pinch it off with my fingers (from the top of the knife – not the blade).
  • Tomatoes >> When dicing the tomatoes, you only want the flesh – not the juice and seeds. So, slice-off the “sides” of the tomato only and ditch the seeds and pulp. That way, you’ve got only what you need and it won’t water-down the guacamole. Who’s the smart one now?
  • No hot peppers? >> Nope. I don’t want to muddy-up my perfect guacamole with heat and spice that will overwhelm the entire thing. If you used your brain once and a while, you’d realize I’m right.
  • Why rinse the onion? >> Raw onion is pretty pungent, and you don't usually want all that onion flavor overpowering the rest of your delicate flavors. So, after the onions are diced, rinse them under cold water - then drain - and they will add just the right amount of onion and not ruin the rest of the thing.

Monday, November 30, 2009

Thanksgiving Turkey Tacos

Disclaimer: I haven't actually made this recipe, but I think it sounds good. Maybe one of you (mom & your friends who read this blog) can give it a try and let me know if I was right.


Thanksgiving Turkey Tacos

This isn't some "south of the border" interpretation of a taco - or some kind of dish where we're substituting turkey for beef - it's basically Thanksgiving in a tortilla, and it sounds God damn delicious!

INGREDIENTS
  • Flour tortillas
  • Left-over roast turkey
  • Left-over coleslaw
  • Left-over cranberries (sauce)
  • Gravy (optional)

INSTRUCTIONS
  1. In a dry skillet, heat both sides of the tortillas until they are slightly darkened - this will soften them up, and make them ready for taco construction
  2. Heat the turkey and gravy in the microwave to eating temperature
  3. Construct tacos: turkey, gravy, coleslaw, and cranberries in that order
Wash it down with some of that kid champagne that was over-bought, and you've got yourself a kick-ass 2nd Thanksgiving - this time in convenient taco form.

Tuesday, November 17, 2009

Recipe: Jambalaya Linguine

I had a good recipe for jambalaya—with rice, but the kids don’t like rice: go figure! So, I converted it to linguine noodles. Guess what? They still don’t like it. They’re bound and determined to be served only hot dogs or chicken nuggets. I’d like to be there in 40 years when their doctors tell them about their terrible colon health – yeah, that’ll be some sweet-ass “I told you so!”

Ooo eee, child. That's some nice jambalaya!

Jambalaya Linguine
Serves 6 (or two great big fat guys)

INGREDIENTS
  • 1 lb. linguine noodles
  • 1 lb. polish sausage, cut in ~1/4” slices
  • 2 green peppers, diced
  • 3 stalks celery, chopped
  • 1 large onion, diced
  • 1 15 oz. can of diced tomatoes
  • 1 8 oz. can of tomato sauce
  • 1/2 cup chicken broth/stock
  • 1/2 cup half & half
  • 2 tsp thyme
  • 1 large bay leaf (or 2 small)
  • 1+ Tbs olive oil
  • 1+ Tbs butter
  • 1 clove garlic
  • Salt & black pepper
  • Fresh parsley (optional)
  • Hot sauce (optional)
INSTRUCTIONS
  1. In a large pot on medium-high heat, sauté onion, green pepper, and celery in olive oil and butter until tender – approx. 10 minutes.
  2. Add thyme, tomato products, bay leaf, 1 tsp pepper, chicken broth, and sausage and cook on medium-low heat for 10 minutes.
  3. Concurrently: boil the noodles according to the package instructions.
  4. Concurrently: in a nonstick skillet, cook the sausage slices in a little butter until slightly crisp – approx. 5 minutes.
  5. Check for salt - add some if needed
  6. Drain noodles and add to pot. Add half & half, stir, and cook ~5 more minutes: until all are incorporated as one dish.
  7. (Optional) Sprinkle-on chopped fresh flat-leaf parsley
  8. Eat. Add hot sauce at the table.
FAQs
  • Polish sausage? >> Ask a Polack to make jambalaya, and you’re bound to get kielbasa thrown-in there somewhere. I suppose a fancy person might tell you to use Andouille sausage or something, well, I’m not that person. The polish sausage adds the exact right flavor, and it’s cheap and easy to find. Also, try to use skinless sausage if possible. A tough skin on the sausage might toughen-up a little in the skillet...
  • Concurrently? >> Yeah, there are a few tasks that should be done at the same time. Boil the noodles and cook the sausage WHILE you’re cooking the vegetables.
  • Half & half? That seems out of place! >> It’s like a vodka tomato sauces that adds cream at the end. It’s just the right thing that the dish needs, but you wouldn’t think of putting it in there. Just add the half & half and enjoy my wonderful experimentation.
  • Hot sauce at the table? I have taste buds made of solid iron! >> Well, lah-dee-dah! I’m sure that you could eat a fiery meteor just after it lands, too! Meanwhile, the rest of us might want to have a different flavor profile better suited to our individual tastes. This isn’t a chili contest, ok? Just ease-up on the spices, and allow the rest of us to spice-it on our own.

Thursday, November 5, 2009

This is Why You're Drunk: Gin Martini

For a long time, I thought I didn't like the taste of gin. I'll blame it on the Army: back in the day, at a Christmas party for my National Guard company, we were to toast with the "company drink:" a truly awful concoction invented back in the 20's. The drink was "Gin & Bitters," and it was revolting.

Fast forward 15 years, and there's a bottle in the liquor cabinet just begging for another chance, and you know what? I liked it!


Quality counts for this recipe - don't embarrass me...

Gin Martini
2 Parts Gin (break-out the good stuff)
1 Part Dry Vermouth
3 Olives impaled on a stick
Ice
  1. Put everything except for the olives in a cocktail shaker
  2. Shake vigorously*
  3. Pour into fancy martini glass
  4. Add olives
  5. Enjoy with sophisticated friends
Remember: this is the kind of drink you enjoy with other people - people who can see how cool you are for drinking the "classic" martini. Good luck!

*NOTE: (10/24/2011) I've had a chance to re-think this recipe over the past 2 years. Everything's good EXCEPT the vigorous shaking. Now I prefer a gentle stir. That way, I'm not getting any shards of cracked ice in my drink (a concern of mine). So, now a conundrum for you: to shake vigorously or to stir gently? My advice: make two and taste for yourself...

Wednesday, September 30, 2009

Recipe: Baked Mac & Cheese

Whoa, it's been a while since a recipe has appeared here (or anything else). I'll chalk that up to "career development," meaning that I've been crazy-busy at work (fuckers!).

Anyway, this is a good one. Usually, I followed a recipe from the book and was pleased, but not overly pleased with the results. The recipe below is better than the ones I've tried before, and it's all because of a common secret ingredient: BACON! Using bacon in your dishes is totally badass!

INGREDIENTS
  • 1 lb Elbow Noodles
  • 1 lb Sharp Cheddar Cheese, grated
  • 1 Onion, diced
  • 3 Cups Milk
  • 1/3 Cup Flour
  • 5 Tbs Butter
  • Cayenne Pepper
  • Salt & Black Pepper
  • 8 oz Bacon, cut into 1/2” pieces
  • 1/3 Cup Bread Crumbs

INSTRUCTIONS
  1. Cook the noodles in boiling water until done. Try to time the noodle cooking to coincide with the cheese sauce cooking. That’s the kind of skill that will separate you from ordinary cooks: the ability to have everything done at once – and the ability to cook things that taste good.
  2. In a large saucepan over medium heat, cook the bacon until “almost crispy.” You don’t want to overcook the bacon. Evacuate the bacon to a paper towel lined plate or bowl and save for later.
  3. Dump all but 1 tablespoon of the bacon grease from the pan, and add onions. Cook in bacon fat until tender stirring occasionally - don't let the onion get too brown (about 8 minutes).
  4. Add 3 Tbs butter to the onions and cook together until the butter has melted. Add flour. Cook the flour for ~3 minutes. This will create a roux which will thicken the sauce. Add milk and stir until the milk is hot and the mixture has thickened (about 5 minutes). Stir cheese into milk mixture until melted (about 30 seconds).
  5. Taste cheese sauce – add 1/2 tsp salt, 1/2 tsp cayenne pepper, and 1/2 tsp black pepper. Taste again – adjust as necessary.
  6. Drain the noodles and return to the noodle cooking pot (I do this because I cook my noodles in my largest pot). Dump-on the cheese sauce and mix. Add the bacon and mix some more.
  7. Melt 2 Tbs butter in a bowl in the microwave (like 30 seconds on high). Add bread crumbs to the melted butter and mix-together with a fork. You’re looking for a “damp sand” texture – this will be the topping. Add more bread crumbs if necessary.
  8. Pour the mixture into a greased 9x13” baking dish. Sprinkle-on the breadcrumb mixture and bake, uncovered, at 400 degrees for 30-45 minutes.
  9. Eat.

FAQs
  • Greased baking dish - WTF? >> For this you can use cooking spray, or be like me and use butter. Just take a little hunk of butter and smear it all over the place with your fingers. It’s messy and fun. Extra bonus: butter tastes good!
  • Bacon. Is this a “heart friendly” meal? >> Who gives a shit? This is a “good tasting” meal and we’ll leave it at that. A big problem with most baked macaroni & cheese dishes is that the flavor gets muted. There’s no chance of that happening with bacon in the mix.

Tuesday, August 25, 2009

This is Why You're Drunk: Limoncello Martini

My wife came home the other night from her sister's house with a gigantic bottle of Limoncello liqueur - seriously, the bottle was like 24" tall! Anyway, the sister couldn't fit the bottle in her freezer, so we get it. Apparently, we're known for the size of our freezer.

I immediately start thinking, "How can I use this liquor?" A quick internet search revealed porn, porn, and more porn. A deeper search revealed a bounty of recipes for Limoncello martinis. I used those, and made a better one:

Ah, refreshing lemony goodness

Badass Limoncello Martini
2 Parts Limoncello
2 Parts Absolut Citron (or your favorite citrus flavored vodka)
1 Part Simple Syrup*
Ice
  1. Pour everything into your cocktail shaker. Affix top.
  2. Shake the shit out of it.
  3. Pour into martini glasses. Garnish with a thinly sliced lemon wheel in the glass

Simple Syrup

1 Cup Sugar
1 Cup Water
  1. Put both ingredients into a small saucepan
  2. Heat & stir until sugar is dissolved and mixture just begins to simmer
  3. Remove from heat and cool in the fridge. This should last all weekend (cover w/ plastic wrap)

Thursday, August 20, 2009

Ham & Cheese Quiche

So fancy! My quiches don't look like this.

Some of you might think of that old axiom: "Real men don't eat quiche!" Well, since very few of you are real men, you have nothing to worry about (except your estrogen-enlarged breasts: get that looked-at!).

The good thing about this recipe is that once you've mastered the "Ham and Cheese" quiche, any other quiche is just a small adjustment away. Let's talk about what's in a quiche: pie crust (great!) and eggs (also great!). I typically make this as a dinner, but it can serve equally well as a lunch or even breakfast. Usually, I'll save some from dinner for the following morning's breakfast and punish my arteries with cholesterol twice as hard.


Pie Crust

INGREDIENTS
  • 1 1/2 Cups Flour
  • 1/2 tsp table salt
  • 6 Tbs Cold Butter (cut-up into many small pieces)
  • 1/4 Cup Vegetable Shortening (Crisco)
  • 2 Tbs Vodka (cold)
  • 2 Tbs Water (cold)

INSTRUCTIONS
  1. If you have a food processor, process 3/4 Cups of flour, salt, butter, and shortening for about 10 seconds. Then add the remaining 3/4 Cups of flour and pulse about 5 times. Dump mixture into a medium/large bowl.
  2. If you don't have a food processor (that's me), add all the flour & salt into a medium/large bowl. Add butter pieces and shortening and mix lightly with your fingers until all the butter and shortening are covered with a layer of flour. Next, take your pastry blender (or fork) and work the mixture until the butter and shortening have been thoroughly incorporated into the flour. It'll look like a God damn mess.
  3. However you got to this step (food processor or no), sprinkle-on the vodka and water and using a rubber spatula (or wooden spoon), fold the mixture over itself until it's all evenly wet. Flatten dough into a large hockey puck, wrap in plastic, and chill in the refrigerator for at least an hour (up to 24 hours). Chilling will allow the dough to even-out and cannot be skipped.
  4. Remove the dough from the fridge and roll-out with a rolling pin using a shitload of flour. This is a very wet dough, and it will require more flour than you think. Especially if you want it to NOT stick to everything. Roll the dough into a round circle - about 3" larger than your pie plate. Place in pie plate.
  5. Check the pantry: if you have "pie weights" or dry beans or a hundred-or-so clean* pennies, line the pie crust with a piece of parchment paper (or tin foil), dump-in the weights/beans/pennies, and bake @ 425 degrees for 15 minutes. If you have no weights, dock* the crust, line with parchment or foil, and bake @ 425 degrees for 15 minutes.
  6. Remove from oven - it's now ready to fill with quiche materials.

FAQs
  • Vodka? Are you serious? >> Yes. Water + flour makes gluten. Gluten is what gives structure to baked goods. Too much gluten makes things tough. Vodka + flour does not make gluten, and there's less of it to get tough in the oven. The vodka doesn't add any flavor to the crust, and you're not going to get drunk from eating this quiche (unless you're chasing it with a tall glass of whiskey - not recommended)
  • You don't instruct me to make fancy pie crust edges >> You're right, I didn't. I'm not all that good with the fancy edges. I just make a "rippled" edge with my fingers and thumbs all the way around. It works and tastes the same. If you want to get fancy with the edges, you have my blessing.
  • What's with the baking of the crust? >> It's called "blind baking," and it partially bakes the crust. If we didn't do this, the inner crust wouldn't cook-up with a heaping load of wet eggs inside.
  • What's a pastry blender? >> It's a tool that's used to "cut-in" butter or fat into flour when making pastry. Here's a picture. In a pinch, you can use a fork, but it will take longer.


Quiche

INGREDIENTS
  • 5 Eggs (3 whole and 2 yolks)
  • 1+ Cup Half & Half
  • 8 oz. Ham Steak
  • 2 tsp butter
  • 6 oz. Sharp Cheddar Cheese (shredded)
  • 4-5 Green Onion stalks (chopped)
  • Black Pepper

INSTRUCTIONS
  1. Thoroughly dry the ham steak with paper towels. Melt the butter in a skillet over medium/high heat. Sear the ham steak on both sides until slightly blackened. This should take about 6 minutes total. The ham is already cooked - we're just adding a little flavor and texture to the ham. After the ham is cooked, dice into small pieces.
  2. In a small/medium bowl, crack three whole eggs and two egg yolks. Add enough half & half to make just over 2 cups of total liquid. This should take about 1 cup of half & half or slightly more depending on the size of your eggs. Add some black pepper (to taste) to the egg mixture and stir.
  3. When the crust is done par-baking, assemble the quiche this way: half the ham, half the cheese, and half the onion. Repeat layers and pour-on the egg mixture. The egg mixture should come almost to the top of the pie crust. If there's not enough liquid to make-it, you can mix-up some more egg and half & half to make-up the difference.
  4. Bake at 350 degrees for 45 minutes. Remove quiche from the oven and cool for at least 10 minutes before serving.

FAQs
  • Can't I just use 5 eggs, and skip the egg separating thing? >> No. The yolks will make the filling more creamy and custard-like. Trust me, that's what you want.

Tuesday, August 18, 2009

This is Why You're Drunk: Sidecar


Last week, the wife and I went to Ruth's Chris to cash-in a birthday $100 gift card. I've been searching for a drink for myself. Not that beer doesn't serve me well enough, but I needed something a little more special:

Sidecar
One part brandy or cognac
One part triple sec
One part lemon juice

Delicious and powerful - just like me. The dinner was good too!

Friday, July 24, 2009

Vacation

You won't have rusrus to kick-around next week, I'll be on vacation


Ah, fuckit! No one reads this site anyway...

Thursday, July 23, 2009

Recipe: Cheddar Corn Chowder

You've heard of “corn chowder,” well, this is the next logical step: corn chowder with CHEESE, and it’s God Damn delicious! I'll say this is more of a fall/winter soup, but it's been so cold this summer that I needed a little something to warm my bones.

Oh, hello bacon. I didn't know you'd be here

Makes approx. 1 gallon of soup

INGREDIENTS
  • 8 oz Bacon, cut into 1/2" pieces
  • 1 Tbs Olive Oil
  • 2 Large Onions, diced (or 3 medium onions)
  • 1 cup Celery, chopped
  • 4 Tbs Butter
  • 1/2 cup Flour
  • 1/2 tsp Turmeric
  • 6 Cups Chicken Broth/Stock
  • 2 lbs. Red Potatoes, diced*
  • 2 lbs. Frozen Corn
  • 1 Cup Half & Half
  • 6 oz White Cheddar Cheese
  • Salt & Black Pepper

INSTRUCTIONS
  1. In a large stock pot, cook the bacon pieces in a little olive oil until “nearly crispy.” Remove bacon with a slotted spoon and set-aside. Cook onion in bacon grease until softened (about 6 minutes). Add celery and cook for another 4 minutes.
  2. Add butter, flour, turmeric, salt & pepper to taste, and cook for 4 minutes. This will develop a roux that will thicken the soup.
  3. Add chicken broth and potatoes. Bring to a boil, reduce heat, and simmer for 15 minutes.
  4. Add cheese, half & half, and corn. Cook for an additional 5 minutes or until the soup returns to temperature and the cheese melts.
  5. Serve hot – crumble the cooked bacon on-top, you've earned it!

FAQs
  1. Bacon AND olive oil? Sounds greasy! >> Sometimes the bacon needs a little head start. I use a little olive oil because I think it adds to the taste. It’s a rich soup and doesn't taste greasy at all. Next time, keep your fucking opinions to yourself!
  2. Cheese and half & half & butter… Are you trying to kill me? >> This isn't diet food, ok? I’m sure there are plenty of salad recipes just waiting for you and your fat ass!
  3. Do I need to cook the corn before I put it in? >> Nope. The hot soup will “cook” that corn just fine. Be sure to bring the soup back up to temperature before serving. The cold half & half and frozen corn will drop the temp quite a bit – it should only take a few minutes to get it back.
  4. What is “turmeric,” and what can I substitute? >> I don’t know what it is besides a spice that they sell at the store, but I know that it makes the soup a very nice shade of yellow. I wouldn't recommend substituting – surely someone of your means and wherewithal can find the time to go to the store to get some.

NOTES
  • Potatoes come in 5 lb. bags - use half a bag, and you'll have another 2.5 lbs. for hash brown breakfast tomorrow.

Monday, July 20, 2009

How to Impress Your Lady at Ravinia


Here in Chicago, there’s an outdoor concert venue where people can relax on the lawn and listen to music. The Chicago Symphony Orchestra plays here in the summer, and people spread-out on blankets and chairs and have fancy picnics. Generally, I’ll do-up a nice spread of cold dishes: raw veggies and dip, crackers and cheese, sausage and mustard, and wine (juice for the kids – unless we can dump them on some poor sucker).

Sometimes, I’ll even make fancy tea sandwiches for my lady. Is it bad ass? No, but you’ll earn points that can be redeemed later (if you know what I’m sayin’…). Most importantly, be sure to have two bottles of wine, or if your lady is a friggin’ drunk, bring three bottles.

INGREDIENTS
  • One loaf of good White Bread (something with a tight crumb and thin slices – I bought Pepperidge Farm White Bread)
  • 8 oz. Cream Cheese (softened)
  • 1/4 Cup Mayonnaise
  • Green olives (sliced)

INSTRUCTIONS
  1. Mix together cream cheese and mayonnaise
  2. Spread on two slices of bread
  3. Place sliced olives on one side
  4. Top with other slice of bread
  5. Cut-off crusts, and cut in half (into two rectangles)
  6. Repeat as necessary
  7. Put finished sandwich rectangles in the cooler

FAQs
  1. What’s “tight crumb?” >> That means the bread isn’t “holey” like Italian bread. The holes are very small, and the bread is “firmer” than Wonder bread.
  2. Sounds like gay food >> I suppose it is, but ladies love gay food. Gay-it-up for Ravinia, and hetero-it-up later in the bedroom (or in the back of the Durango if you can’t wait that long)
  3. What kind of beer goes with these sandwiches? >> You’re friggin’ hopeless.

Thursday, July 9, 2009

I wish I thought of this...

After hearing my son bitch about lunch for half an hour, I finally told him to go make his own damn lunch. A few minutes go by, and I investigate:


Peanut Butter & Nutella Sandwiches

Well, at first I was like, "Godammit! You're making a mess in here!" Then I was like, "Holy shit, what a great idea!" After a quick internet search, I see that the boy didn't invent shit - it's something that fat people have been eating for a while. But, damn - that looked like a good sandwich!

For those of you who don't know, Nutella is a chocolate hazelnut spread that is fucking fantastic! The consistency is like peanut butter, and you keep it in the cabinet. Mmm, I wonder if that jar will last the afternoon - doubtful.

Recipe: Biscuits and Gravy

So, you're looking for the perfect breakfast, eh? Well, look no further. What I've got here will help you gain those extra 10 pounds you've been missing - and in delicious manner. Also, might I add that this is a big hit with the ladies.

Wow! A plate full of biscuits, gravy, and scrambled eggs.
Is this heaven? No, it's breakfast.

Dude Likes Biscuits and Gravy
Being from the North, people wonder how in the hell I've first, developed a taste for biscuits and gravy, and second, amassed the requisite skills with which to build the most perfect plate of biscuits and gravy on the entire planet! Well, who knows? All I know is that these are perfect and easy and just what’s needed if you’re looking to expand-into those fat-pants your wife bought you for Christmas.


Mmm, biscuits taste good...
Biscuits

INGREDIENTS
  • 2 Cups All-Purpose Flour + ~3/4 Cup extra for "rolling-out"
  • 2 Tbs Cold Butter
  • 2 Tbs Shortening (aka Crisco)
  • 4 tsp Baking Powder
  • 1/4 tsp Baking Soda
  • 1 tsp Kosher Salt
  • 1 Cup Buttermilk

INSTRUCTIONS
  1. Mix the dry ingredients together (flour, salt, soda, powder). Some would ask you to "sift," but that's not badass - sifting is for pussies!
  2. Cut the butter into little cubes (you can easily get 8 cubes) and put it in the dry ingredients - also add the shortening. Knead the butter and shortening into the dry ingredients with your fingertips. The goal is to get the fats covered with flour and into smaller and smaller pieces. The danger is working the fats so much that they melt. Stop kneading when the dry/fat mixture resembles cornmeal (~2 minutes)
  3. Pour-in the buttermilk, and mix together briefly with a large spoon. The goal is to get the buttermilk into the mix, but this isn't a "stirring" kind of thing - just mix a few times and move-on.
  4. Sprinkle some flour on the counter, and dump the bowl's contents onto the flour. This is the part where you'll knead your biscuit dough, but it's a tricky part, so pay attention moron:
  5. You'll now have a heap of dry and wet (it's not homogeneous) lump of dough on the floured counter. I use both hands, and push the dough together, then flop-it 90 degrees to the right (a new surface will be on the board) and repeat until the dough resembles "dough." The goal is to be as gently as possible with the dough - over-working biscuit dough will make them tough, and you'll know it as soon as you take that first bite. My biscuits are God damn good because I do it right.
  6. Be sure to add flour as you need it. You'll probably have to sprinkle the top and the bottom of the dough a few times. Plan on working the dough for no more than one minute. You should use nearly all the flour - at least 1/2 cup.
  7. Shape the dough into a ~3/4" high layer of dough. It doesn't have to be round--you're not making a pie crust--just get it into a rough rectangle shape. Use your hands to push-down the dough. You don't need a rolling pin - hands are good enough. If you use a rolling pin, I'm going to come-over and bash it over your head...
  8. Use a biscuit cutter to cut-out the biscuits. WTF is a biscuit cutter? Glad you asked. It's a tool use to cut biscuits into repeatable shapes. Since you don't have one, you can use a soup can with the top & bottom cut off, or a drinking glass. The can will work better because the metal sides are thinner, but you get the idea: cut the biscuits into rounds the size of a soup can. Oh, and add "biscuit cutter" to your grocery list for next time - they're like $2, and will last forever.
    • Scraps: you’re going to have scraps of dough. Mix-together the scraps as gently as possible and flatten-out into another rectangle. Repeat the biscuit cutting process. These biscuits will be tougher than the original ones, but still better than shitty restaurant biscuits.
  9. Place the cut biscuits onto a sheet pan lined with parchment paper. The parchment paper is not an option, you MUST use it. Why? First, because I said so. Second, because it will keep the bottom of the dough from over-cooking. Also, you won't have to clean your sheet pan if you use parchment paper. Place the biscuits close to one another, but not touching – about 1/4” of space between biscuits.
  10. Bake at 425 degrees for ~20 minutes. They're done when they're slightly browned on the outside - might be done early, but not less than 15 minutes.

FAQs
  • How do I eat these? >> These biscuits are great by themselves, or even better with gravy (keep reading). Makes ~12 biscuits depending on size
  • Salt: Can I skip the salt? >> Nope. I accidentally forgot the salt the other day, and the biscuits were bland. Tell your doctor you now have a high-sodium diet and to recalculate your blood pressure medicine.

Sausage Gravy

INGREDIENTS
  • 1 lb Breakfast Sausage (1 tube)
  • 3 Cups Milk (or 2 cups milk + 1 cup half & half)
  • 1/3 Cup A/P Flour
  • 1/2 tsp Cayenne Powder
  • 3 Tbs Butter
  • Black Pepper

INSTRUCTIONS
  1. In a large saucepan cook the sausage in 1 Tbs of butter until browned. Remove the sausage with a slotted spoon - try to leave as much grease in the pot as possible. Reserve the sausage (that means, don't throw it away).
  2. Check the pot - you'll need 3 Tbs of sausage grease/butter to continue. So, if you have too much, remove some. If you have too little, add a little butter.
  3. Cook the flour in the melted butter/grease mixture for ~3 minutes. You're now making a roux ("roo," like kanga-roo). This is used as a thickener, and it works very well.
  4. Once the flour has cooked, add the milk slowly - stirring the whole time. There are a few things you should have noticed when adding the milk: first, it hydrated the flour and made a thick paste; second, the paste got thinner and thinner as you added all the milk. Good job monkey, you did it right.
  5. Cook the milk & roux mixture over medium heat for a few minutes. The goal is to return the milk to a simmer - the roux will thicken the whole amount of milk, but it happens as the mixture reaches boiling temperature (don't over boil this - you're not trying to sterilize surgical instruments). Add-in the cayenne pepper.
  6. When the mixture hits a simmer, toss-in the reserved sausage and stir together. If it's too dry, feel free to add-in some more milk (or half & half), but not too much. Best to go a little at a time until it's perfect.
  7. Put the remaining 2 Tbs of butter on the top (it'll melt-in, and that's good)
  8. Eat

FAQs
  • How to eat biscuits and gravy >> Take one or two biscuits, split them in half (think “Oreo”), and put them on the plate. Now pour-on the gravy. This makes more than enough for a family or four - probably the perfect amount for a family of six, but no one better want seconds. For the ultimate in early-morning decadence, serve with a helping of perfectly cooked scrambled eggs and a tank of black coffee. Next, clear a place on the couch for your nap.

Monday, June 29, 2009

Recipe: Mashed Potatoes

This isn't really a main dish (unless you're a goddamn lunatic), but I'll feature delicious side dishes too. It's the perfect thing to go with a steak or some meatloaf. Able to support a ladle-full of gravy or half-stick of butter equally. Now, go get yourself some!
One plate for mashed potatoes - another plate for anything else


INGREDIENTS
  • Baking Potatoes (they're brown and they're big – also known as “Russet” or “Burbank”)
  • Kosher Salt
  • Half & half – at least 1 cup

INSTRUCTIONS
  1. Peel the potatoes. Generally, I peel potatoes in the sink with the water running slowly. I use the water to rinse-off the dust and small pieces of peel that stay on the potato – it’s faster for me. But I whole-heartedly recommend turning “potato-peeling” into some forced-work activity for your children just like in the Army. There’s no reason the youth of today can’t participate in proven character-building exercises.
  2. Quarter the potatoes – which means cut them into four equal parts. Do this because it will make the potatoes cook faster than trying to boil a whole potato, but don’t cut into smaller pieces because the flavor will “wash-out” of smaller pieces boiling in a big pot of water. Generally, you’re looking for pieces that are roughly the size of a golf ball, so if you have small potatoes, just cut into two pieces. Oh, do whatever the hell you want.
  3. Place the potatoes in a large pot and sprinkle-on 1-2 Tbs of Kosher salt. Add water to the pot - just to cover the potatoes. You want just enough water to cover, but not so much that they’re water-logged.
  4. Lid-up and add heat. Bring to a boil and then back-off to a medium-low heat. Watch carefully because the starch in the potatoes will combine with the water to make persistent bubbles. These bubbles will rise and rise to the lid and, if there isn’t enough room in the pot, will boil-over and make an awful god damn mess all over your cook top. So, be sure to watch, and lower the heat if it’s getting out of control. You can also skew the lid so that some of the steam escapes the pot – this will help prevent nasty boil-overs.
  5. The potatoes should be done at 20 minutes, but they might be done a little sooner or a little later. You can check by inserting a paring knife into the potato. If it goes-in cleanly, the potatoes are finished cooking.
  6. Drain water from the pot.
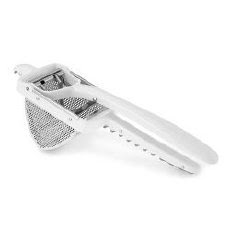
  7. There are two methods for mashing:potato ricer
    • Ricer method: this is the preferred way. Takes a little longer, but it's worth it!
      1. Buy a “ricer.” It’s a contraption with two handles and a perforated metal “cage.” Squeezing the handles will squish whatever’s placed in the cage through the holes. In the case of potatoes, they will come out of the ricer without lumps – the most perfectly creamy potatoes of your life. Ricers are generally ~$20 at a kitchen place.
      2. Put the drained potatoes into a separate bowl
      3. Use the ricer and squish the potatoes back into the cooing pot.
      4. Keep ricing until the potatoes are finished.
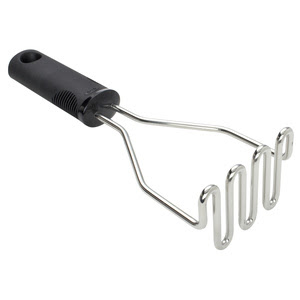
      5. Good job!potato masher
    • Mashing method: these are delicious too. Easier than ricing, but a more "down home" texture (i.e. there will be a few lumps, but they'll be delicious lumps)
      1. Put the drained potatoes back in the pot.
      2. Use the potato masher.
      3. Stop mashing when the texture makes you happy.
  8. Add ~1 cup of half & half and stir. You may need to add more depending on how dry the potatoes are
  9. Finished.

FAQs
  • Baking potatoes? I thought this was “Mashed Potatoes?” >> Ok, there are two general characteristics to potatoes: waxy & starchy. “Brown” potatoes are more starchy and red potatoes are more waxy. For “mashed” potatoes, you want that starch. People say “baking” potatoes because they look like the prototypical baking potato, and most people are stupid and can’t think of terms like “starch” at the grocery store – they need a visual cue to buy the correct produce (please take me to a smarter place...)
  • What about butter & milk? >> Essentially, that’s half & half: half cream and half milk. Why are you ruining my time-saving step?
  • What about an electric mixer? >> Yeah, those are the potatoes I had all throughout my childhood, and they were ok. They weren’t great, just ok – I used to think they were great, and then I made these... Just do what I tell you, and you’ll be happy.

Wednesday, June 24, 2009

Recipe: Ribs

This is the first recipe because it's a badass God damn recipe!

Dude, these ribs rock the house!! They take hours, but they're pretty low-work hours, so that's a plus!


Ribs

INGREDIENTS
  • Rib Rub (recipe follows)
  • Baby Back Ribs
  • Tin Foil
  • BBQ Sauce (your choice - I prefer Open Pit)
INSTRUCTIONS
  1. Rinse the ribs under warm water and pat dry with a wad of paper towels.
  2. Sprinkle both sides of the rack o' ribs with the rib rub. You don't need to drown the meat in that shit, but get a good even coating. Gently pat the rub to ensure it's sticking somewhat to the meat.
This is a decent amount of rub. Be sure to use your hands and make sure it's sticking to the meat
  1. Wrap the ribs tightly in foil. The WIDE foil works best. My guess is that if you're not using wide foil this time you will be next time!
Ribs weep while cooking. Note how I place the ribs. I want to minimize the mess in my oven.

Collect the sides at the top, and fold/roll down. Done and done
  1. Cook the ribs in a 225 degree oven for four (4) hours. This will gently heat the ribs-through while letting the ribs percolate in the rub. Mmm, that's God damn delicious.
You can fit two racks on a half-sheet pan
  1. Time's up! Take-out the ribs. At this point, the next step is the grill. You can rest the ribs (preferred) and go attend to the heating of the grill, or take them straight to a ready-to-go grill: it's your choice. Personally, I rest them - because I'm lazy.
  2. When it's grillin' time, cut the slabs into manageable-sized pieces (three pieces per slab is about right). Put onto grill (meat-side down first) and then dab the bone-side with some sauce. Cover the grill and walk-away for 5 minutes.
  3. Return to the grill and flip the ribs. Dab the new side with some sauce. You should notice some char now: that's the flavor! Cover and walk-away for another 5 minutes.
  4. Evacuate the ribs to a plate, put-on your eatin' clothes, and get to work. If you did it right, your family will now look upon you more respectfully - but not in my house: my respect level has already been maximized!
FAQs
  • Open Pit? >> Yes, I said "Open Pit," motherfucker*! It's a classic for anyone growing-up in the 70's and 80's, before all the "fancy" sauces hit the market.
  • Grill >> I use a charcoal grill, so it's blazing hot. If you have a gas grill, crank that up to high and prepare to burn!
  • Why are you saucing and rubbing both sides of the ribs when the meat is conveniently located on one side? >> First, because I said so. Second, because you never know what people are going to eat. You might have a crazy carnivore at the table who wants to mouth-love the bones until they're clean and ready to be reassembled in a museum. Probably, though, they're going to be like my kids: eating only the "easy to get-at" meat, and then throwing-away a rib with enough meat to feed a Chinese village...
  • How long do I need to rest the ribs? >> Well, you can rest them for zero minutes, or up to a few hours (I guess). There's no problem with a long rest - they'll get back-up to temperature on the grill. Just keep them in the foil packet. You can easily leave them in the oven (shut-off of course) until you're ready to use them. I'd stay-away from putting them in the fridge unless you're going to use them another day.
  • What happens if they're so tender that a few bones fall-out on the grill? >> Well, you are now the rib master of the house. Go get yourself a reward beer for your troubles (and then another) and just be gentle with the boneless meat - it'll still char-up real nice.
  • Eating >> Have some sauce at the table for those who like more sauce.
NOTE*: I have since tried “Sweet Baby Ray’s” BBQ sauce, and it’s pretty good. I suppose if you were to use that sauce it wouldn't be the worst thing that’s ever happened...


Rib Rub

Power-up this recipe to make more rub. This is just about enough rub for two (2) slabs of baby back ribs.

Finished rub. Mix all ingredients with a fork (pictured)

INGREDIENTS
  • 8 Tbs Light Brown Sugar (tip: 8 Tbs = 1/2 cup)
  • 3 Tbs Kosher Salt
  • 1 Tbs Chili Powder
  • 1 tsp Onion Powder
  • 1 tsp Cayenne Pepper
  • 1 tsp Thyme
INSTRUCTIONS
  1. Mix all together. No shit. Note: use a fork to break-up the brown sugar - it has a tendency to clump together. Don't worry too much if the brown sugar doesn't completely disintegrate, little sugar nuggets will be ok for the ribs - maybe even recommended
FAQs
  • What if I don't have all those ingredients? >> The first three are mandatory - the next three are optional AND customizable. You can go batshit crazy here and invent a new rib rub - just stick with the first three and your last three can be as weird as you want.
  • Storage >> you can make a lot of this, and then put it in a cheese shaker (like me). To keep it from getting nasty, put a piece of wax paper under the cap of the shaker. This should stay reasonable fresh all summer (6 months max). But if it's in the cupboard for 6 months and doesn't get used, you’re disrespecting the institution of ribs, which is bad.